Showing posts with label Subtle folder. Show all posts

Monday, 5 August 2019

Lilypad Lake meets Perennial Birthday

Lilypad Lake meets Perennial Birthday

Well Perennial Birthday seems to be my go to stamp set for birthdays at the moment. Especially for male cards.

These two cards are the same except for the Enjoy sentiment, I couldn't decide which one to use so did one of each. I'm veering towards the red on white, which do you prefer?
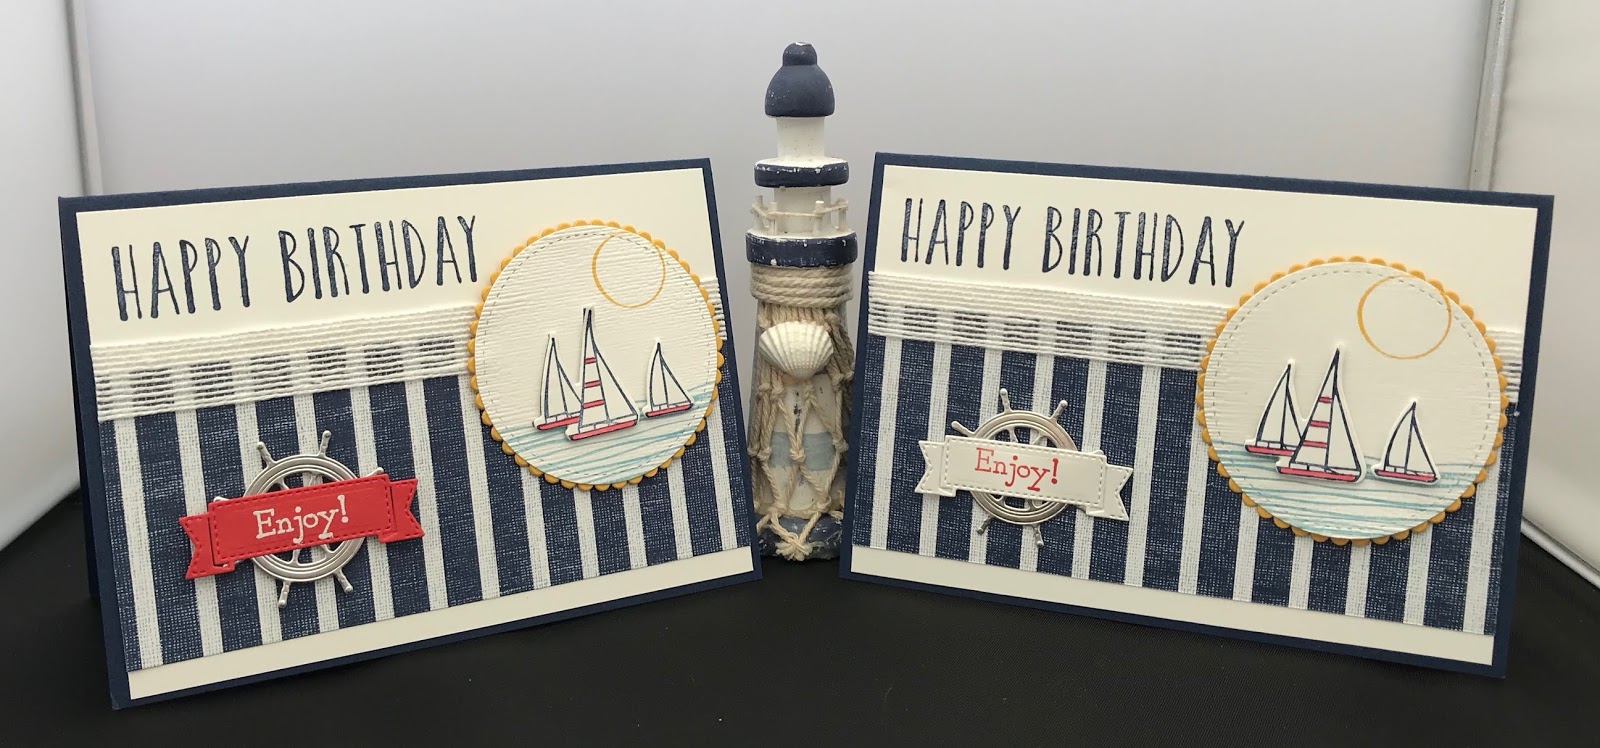


It's quite an easy card to make (I don't do hard cards) ha ha!!

To recreate this card follow the guide below:
® = retired, (sab) = Sale-A-Bration, (H) = Hostess, (nsu) = not stampin’ up, (ss) = Stamp set, (DSP) = designer series paper, (CS) = Card Stock,
when working with layering dies I start with the largest and work down (ie: the largest is number 1 and the smallest 4).

Card Stock and measurements: (Centimetres)
Night of Navy: 21 x 14.5scored at 10.5
Whisper White: 4 pieces, 14.3 x 10, 4.5 x 3.5, 5.5 x 2, 6.5 x 6.5
Crushed Curry: 7 x7
Silver Foil: 4 x 4
Come Sail Away DSP: 14.3 x 6
Flax Ribbon: 14.3
Embossing Folders: Subtle
Dies: Layering Circles, Lakeside, Smooth Sailing,  Stitched Shapes
Stamp Sets: Bella & Friends ®, Lilypad Lake, Perennial Birthday, Sailing Home
Stampin' Blends: Poppy Parade
Stampin' Pads: Balmy Blue, Crushed Curry, Night of Navy, Poppy Parade

Stamp the happy birthday in the top left corner of the Whisper White layer in Night of Navy.
Adhere the DSP about 0.5 from the bottom of the same layer using liquid glue.
Add the ribbon at the top of the DSP half on half off, and adhere using tear n tape.
On the square of Whisper White,  stamp the waves at the bottom, then the yachts (don't worry about the overlay) and lastly the sun towards the top (make sure it's not too high up.
On the smallest piece of Whisper White stamp the Enjoy sentiment in Poppy Parade.
On the last piece of Whisper White stamp the yachts again in Night of Navy.
Now colour in the sails using the blends.
Place all items to be die cut on your plate together. Silver Ships Wheel, Crushed Curry scalloped circle No:4, yacht scene Stitched Shapes circle No: 2, banner, separate group of yachts.
Adhere the yacht scene to the scalloped circle using liquid glue then attach to the base card using dimensional pads.
Overlay the yachts using dimensional pads.
Adhere the banner to the Helm using liquid glue and attach to the base card using dimensional pads.
Will be back again soon with more cards!!
Annette X

Thursday, 14 March 2019

Happy Birthday Gorgeous meets Butterfly Gala

Hello fellow crafters,

I went for a bright and happy card for my sister today and just hope she likes it. She's got a big one coming up next year, but I won't give away which one until next year.!!!

It's one of my usual type of cards, easy and simple.

I've discovered that March is now quite a busy month for celebrations and things, and of course I try to get at least 6 Christmas cards done each month as well, so there's no mad rush later in the year.


To recreate this card follow the guide below:
® = retired, (sab) = Sale-A-Bration, (H) = Hostess, (nsu) = not stampin’ up, (ss) = Stamp set, DSP = designer series paper, CS = Card Stock

Start with a base card of Whisper White(cs) measuring 21 x 21.5 cm scored at 10.5cm.

Across the front of the card base and using the Large Letters framelits, set out the letters for the word you want (sister) and die cut them (for the spacing I wanted, I needed to run the card through twice doing the 1st, 2nd, 4th and 6th letters on the first run through and the 3rd and 5th on the second run through.
Stamp the Happy Birthday from the Happy Birthday Gorgeous (ss) wherever you want it along the bottom. 
Now run the front of the card through the Big Shot using the Subtle folder. Again this needs to go through twice.
Cut a backing mat measuring 21.4 x 10.4 cm using Calypso Coral and placing it behind the front of the card adhere using liquid glue.  
Using Watercolour Wonder ® dsp die cut the letters again using the Large Letters framelits. to make the letters stronger I adhered them to the plain letters already cut out form the card and then placed them back on the card using dimensional pads.
Using an off cut of Whisper White stamp a pair of butterflies, twice from the Butterfly Gala (ss) using the thumping technique (ink up the stamp with the main colour and then using a Stampin' Marker lightly tap the second colour randomly across the top, and stamp). Now using the Butterfly Duet punch,  punch out the butterflies. Place the butterflies where you want them and stamp the antennae.  Add some Wink of Stella and Basic Pearls then adhere to the card using dimensional pads.


Will be back again soon with more cards

Love Annette x

Monday, 4 February 2019

Balloon Celebration meets Picnic with You

The sun is now shining and it feels quite warmer than it's been over the last few days which is great.

It's my lovely neighbours birthday today and this is what I came up with. There looks to be a lot going on but once I'd completed it I thought it looked rather nice, along with being relatively easy to do. 


To recreate this card follow the guide below:
® = retired, (sab) = Sale-A-Bration, (H) = Hostess, (nsu) = not stampin’ up, (ss) = Stamp set, DSP = designer series paper, CS = Card Stock

Start with a base card measuring 10½" x 5¼" scored at 5¼."
first layer is grapefruit grove and measures 5 x 5 and is embossed using the subtle folder.
Second layer is a piece of Whisper White (cs) measuring 4¾ x 4¾" covered with a piece of graceful glass vellum measuring 4¾" x 3½" and a piece of wood textures dsp measuring 4¾" x 1⅜"  (if you use tombo liquid glue to adhere the vellum, when dry it's invisible).
Add ribbon of your choice across the join. I used retired lace and the Current In Color ⅛ Grosgrain.
Using off cuts of Whisper White (cs) stamp the flower heads, stems and basket from the Picnic with You (ss)  ®. 
Die cut the pieces using the Picnic Basket Builder framelits ® and then emboss the basket using the embossing frame from the same set.
Now assemble them where you want them and adhere to the card.
(I adhered the stems to the back of the basket with wet glue and then attached the basket and flower heads with dimensional pads to the card).
Using the Balloon Celebration (ss) I stamped the happy birthday on another piece of off cut (cs) and using the Banner Triple punch created a tail.


Will be back again soon with more card

Love Annette x


Wednesday, 9 January 2019

Simple 21st

It's our eldest Grandson's birthday today and as you can see he turns 21!!! What a mile stone that is.

Again I'm using some products that are no longer in the catalogue, naughty me.

I'm what they call a lonely crafter. None of my friends or family craft, so I've never really been able to turn my hobby into a cottage industry as so many demonstrators have been able to do, so I just do it for my own pleasure.

I keep trying to get people interested but so far no luck!!!


To recreate this card follow the guide below:
cs = Card Stock, dsp = Designer Series Paper, ® = Retired

Start with a Basic Black base card measuring 5” x 7”
Cut a piece of Sliver Foil measuring 4½” x 6½”  and using the Startdust and Large Numbers dies cut the Stardust and Numbers from the middle, place these to one side for now, then adhere this to the base card as the second layer.
Using Basic Black cs cut a third layer measuring 4¼” x 6¼” and emboss the sentiments using VersaMark and silver Embossing Powder and adhere to the second layer.
Cut another piece of Silver Foil 6¼” x 2” and back it with some Adhesive Sheeting, then die cut with the wavy lines from Swirly Scribbles dies.
Place the wavy lines across the middle of the card and adhere.
Using a piece of scrap Basic Black cs die cut a circle from the Layering Circles dies to fit just inside the silver starburst, emboss this with the Subtles embossing folder and adhere it. 
Using dimensionals place the numbers on top, then again using dimenionals add the starburst across the wavy lines.

That's it folks!!! job done.


Will be back again soon with more cards


Love Annette x

Sunday, 6 January 2019

Birthday Banners meets Daisy Delight

Happy New Year!!!

It look's like a nice day today here in the West Midlands, but quite cold. Need to go out later so hope it doesn't get any colder. Been a bit under the weather lately and don't want to catch a cold.

So, this is the first card for 2019 and there are a lot more to follow.

Primarily I created this blog as a reminder for myself as to what I've done in the past and how I did it. But if anyone wants to follow along and use what I've done you're more than welcome.


To recreate this card follow the guide below:
cs = Card Stock, dsp = Designer Series Paper, ® = Retired

Start with a base card 10.5 x 14.5 cm, sponged lightly with Grapefruit grove ink around the edge. 
First layer is 10 x 14 cm embossed with the Subtle embossing folder and then a piece of the grapefruit grove In Colour dsp adhered to the bottom measuring 10 x 7.5
Place a layer of Classic Weave ribbon round the dsp and added a some In Color Grosgrain ribbon on top of it finishing off with a small bow. 
Stamp 3 daisies and 2 leaves from the Daisy Delight stamp set.
punch out the daisies using the Daisy punch and fussy cut the leaves (not my favourite thing to do). 
Layer the two daisies to make one and put it where you want it on the card then add the leaves behind. 
Using  the  Birthday Banners stamp set, stamp the happy birthday and die cut it using the Bunch of Banners die set.
Die cut a second banner in grapefruit grove and adhere the edging down then insert the happy birthday in the middle. 
Add some Faceted Gems
Attach to the base card and all’s done.

Will be back again soon with more cards


Love Annette x