Showing posts with label Layering Circles. Show all posts

Monday, 5 August 2019

Lilypad Lake meets Perennial Birthday

Lilypad Lake meets Perennial Birthday

Well Perennial Birthday seems to be my go to stamp set for birthdays at the moment. Especially for male cards.

These two cards are the same except for the Enjoy sentiment, I couldn't decide which one to use so did one of each. I'm veering towards the red on white, which do you prefer?
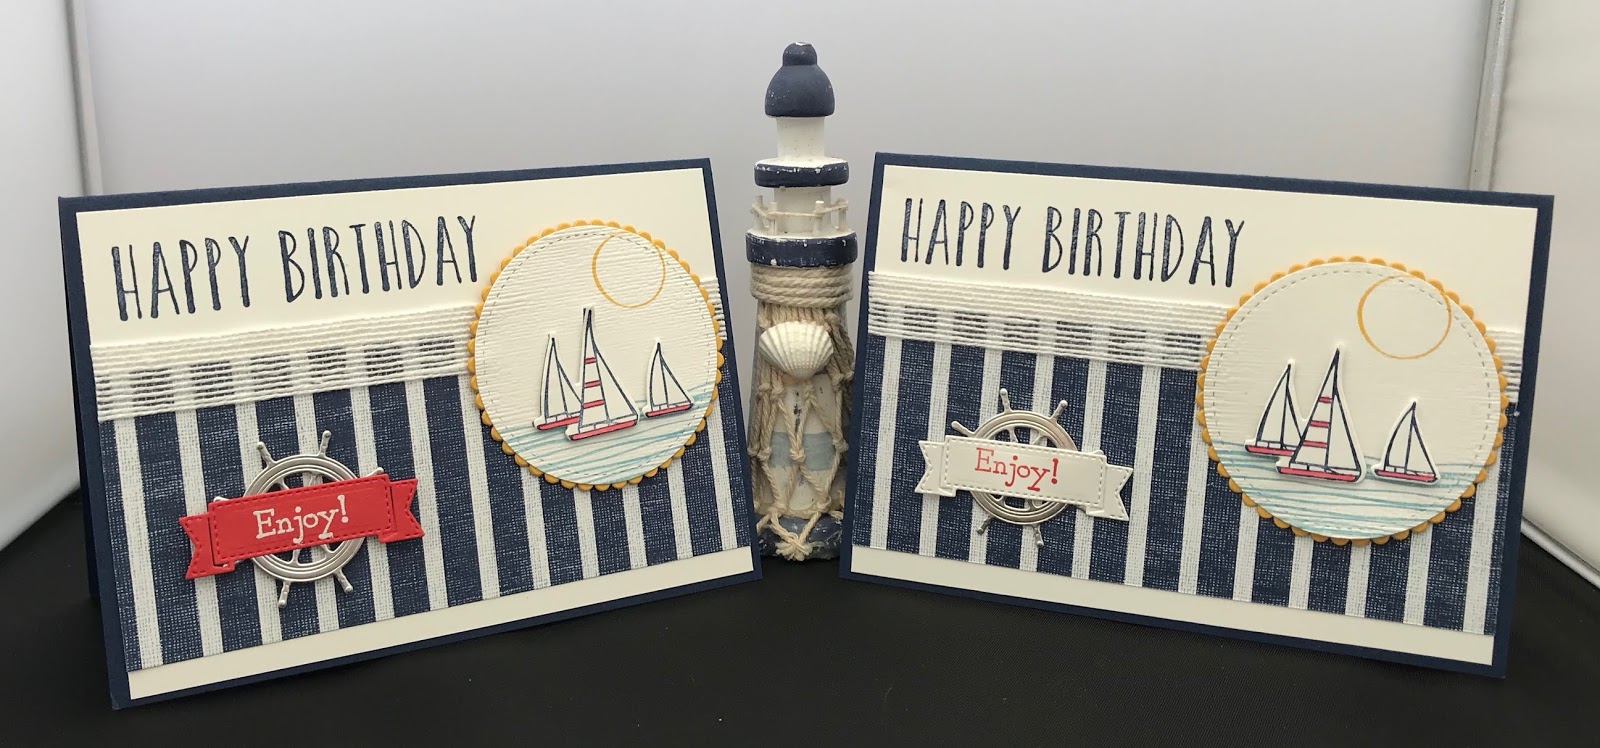


It's quite an easy card to make (I don't do hard cards) ha ha!!

To recreate this card follow the guide below:
® = retired, (sab) = Sale-A-Bration, (H) = Hostess, (nsu) = not stampin’ up, (ss) = Stamp set, (DSP) = designer series paper, (CS) = Card Stock,
when working with layering dies I start with the largest and work down (ie: the largest is number 1 and the smallest 4).

Card Stock and measurements: (Centimetres)
Night of Navy: 21 x 14.5scored at 10.5
Whisper White: 4 pieces, 14.3 x 10, 4.5 x 3.5, 5.5 x 2, 6.5 x 6.5
Crushed Curry: 7 x7
Silver Foil: 4 x 4
Come Sail Away DSP: 14.3 x 6
Flax Ribbon: 14.3
Embossing Folders: Subtle
Dies: Layering Circles, Lakeside, Smooth Sailing,  Stitched Shapes
Stamp Sets: Bella & Friends ®, Lilypad Lake, Perennial Birthday, Sailing Home
Stampin' Blends: Poppy Parade
Stampin' Pads: Balmy Blue, Crushed Curry, Night of Navy, Poppy Parade

Stamp the happy birthday in the top left corner of the Whisper White layer in Night of Navy.
Adhere the DSP about 0.5 from the bottom of the same layer using liquid glue.
Add the ribbon at the top of the DSP half on half off, and adhere using tear n tape.
On the square of Whisper White,  stamp the waves at the bottom, then the yachts (don't worry about the overlay) and lastly the sun towards the top (make sure it's not too high up.
On the smallest piece of Whisper White stamp the Enjoy sentiment in Poppy Parade.
On the last piece of Whisper White stamp the yachts again in Night of Navy.
Now colour in the sails using the blends.
Place all items to be die cut on your plate together. Silver Ships Wheel, Crushed Curry scalloped circle No:4, yacht scene Stitched Shapes circle No: 2, banner, separate group of yachts.
Adhere the yacht scene to the scalloped circle using liquid glue then attach to the base card using dimensional pads.
Overlay the yachts using dimensional pads.
Adhere the banner to the Helm using liquid glue and attach to the base card using dimensional pads.
Will be back again soon with more cards!!
Annette X

Sunday, 2 June 2019

Twinkle Twinkle meets Animal Outing new baby

Well today I was just looking back over some of my previous blogs and came across this one I was supposed to post back in January!!! would you believe. But somehow it got lost in the list and wasn't put up, but i like it, so decided to post it today. Hope you like it, I've left it as it would have gone up except for this paragraph.

Our family has become a little bigger today, my cousin's wife has just delivered a beautiful baby boy into the family and everyone is so happy for them.

As we knew she was having a boy I was able to get the card done a couple of weeks ago and after looking through my stamp sets for new babies I decided on using this one as the others seemed to be a bit dated now.  I'd seen it on Pinterest and CASd it (sorry I can't remember who's it is) but thank you.


To recreate this card follow the guide below:
cs = Card Stock, dsp = Designer Series Paper, ® = Retired

Start with a base card measuring 21 14.5cm scored at 10.5.
first layer is DSP measuring 9.7 x 13.7 and adhered straight down.
With some off cuts of whisper white and balmy blue stamp the Welcome, Kangaroo and Little one from the Animal Outings stamp set leaving room around each of them to do the die cutting.

Colour the kangaroo, I used my stampin' blends for this crumb cake and call me clover from my new blends as well as Ivory and nude from my old stash.
Using the Layering Circles for the soft foam scallop circle, Stitched Shapes for the two larger white circles, Stitched Labels for the little one circle and small heart. Wood Crate for the heart. All of these can be die cut at the same time.
Now die cut the Kangaroo using the Animal Friends dies.
Emboss the welcome circle and the larger circle using the Subtle folder.
Adhere the kangaroo to the larger circle using dimensional pads and ground him with a bit of colour.
Arrange the rest of the elements using a combination of wet glue and dimensional pads.
Add a ribbon.

Will be back again soon with more cards


Love Annette x


Tuesday, 28 May 2019

Fox Builder Punch meets Happy Birthday Gorgeous

Hello Folks,

This is a very easy card to make, and fun to do. I believe it was on Julie's Japes the Paper Haven blog.


To recreate this card follow the guide below:
® = retired, (sab) = Sale-A-Bration, (H) = Hostess, (nsu) = not stampin’ up, (ss) = Stamp set, DSP = designer series paper, (cs) = Card Stock

Base card measures 14.8 x 21cm scored at 10.5cm and dry emboss using the Subtle folder.

Highland Heather matt measures 9.5 x 11cm
Gingham Gala (dsp) measures 9 x 11cm
Highland Heather circle measures 7 x 7cm
Whisper White circle measures 6.5 x 6.5cm
Highland Heather & Whisper White banners measure 6.5 x 5cm
Smoky Slate measures 6.5 x 6.5cm

Dry emboss the front of the base card using the Subtle folder

Adhere the Gingham Gala (dsp) to the Highland Heather matt using liquid glue.

Use dimensional pads to attach this matt to the base card.

Die cut the 2 circles at the same time, using the Layering Circles dies for the larger one and the Stitched Shapes  dies for the smaller one. Adhere these together using liquid glue, then attach to the card using dimensional pads.

Now put the mouse together. 

Using the Fox Builder punch and Smoky Gray (cs) punch out 1 fox, then using Basic Black punch the smaller nose.
Punch 2 circles using a ¾" Circle punch in Smoky Slate
Using Owl Builder punch, punch the 2 larger circles in Blushing Bride (cs), the 2 feet in Smoky Slate and the 2 smallest circles in Basic Back (cs).

For definition sponge the edge of the all the pieces in corresponding ink.

Adhere all the pieces to the card base using liquid glue except for the head and feet.

Stamp the happy birthday from the Happy Birthday Gorgeous (ss) and punch out using the Duet Banner Punch. Punch a second banner in Highland Heather and layer these together using small dimensional pads. Add the owls feet as hands using liquid glue. Add this to the base card again using small dimensional pads.

Color 3 Basic Rhinestones using the Highland Heather Blends and add them across the bottom of the card.

Will be back again soon with more cards.
Annette x

Wednesday, 9 January 2019

Simple 21st

It's our eldest Grandson's birthday today and as you can see he turns 21!!! What a mile stone that is.

Again I'm using some products that are no longer in the catalogue, naughty me.

I'm what they call a lonely crafter. None of my friends or family craft, so I've never really been able to turn my hobby into a cottage industry as so many demonstrators have been able to do, so I just do it for my own pleasure.

I keep trying to get people interested but so far no luck!!!


To recreate this card follow the guide below:
cs = Card Stock, dsp = Designer Series Paper, ® = Retired

Start with a Basic Black base card measuring 5” x 7”
Cut a piece of Sliver Foil measuring 4½” x 6½”  and using the Startdust and Large Numbers dies cut the Stardust and Numbers from the middle, place these to one side for now, then adhere this to the base card as the second layer.
Using Basic Black cs cut a third layer measuring 4¼” x 6¼” and emboss the sentiments using VersaMark and silver Embossing Powder and adhere to the second layer.
Cut another piece of Silver Foil 6¼” x 2” and back it with some Adhesive Sheeting, then die cut with the wavy lines from Swirly Scribbles dies.
Place the wavy lines across the middle of the card and adhere.
Using a piece of scrap Basic Black cs die cut a circle from the Layering Circles dies to fit just inside the silver starburst, emboss this with the Subtles embossing folder and adhere it. 
Using dimensionals place the numbers on top, then again using dimenionals add the starburst across the wavy lines.

That's it folks!!! job done.


Will be back again soon with more cards


Love Annette x

Saturday, 18 August 2018

Falling In Love

It was our friend's 30th Wedding anniversary last month and I didn't have a clue  what to do so went for soft subtle colours and this is what I came up with. 

A lot of the materials used are now retired but I'm sure there's alternatives in the the current catalogue. The only thing missing at the moment are number dies (hopefully SU will remedy that soon) we all use numbers don't we!


The materials used are:
® = retired, (sab) = Sale-A-Bration (nsu) = not stampin’ up

Stamps: floral phases, timeless love ® Colours: blushing bride, shimmery white, soft sky ®, fresh fig, versaMark DSP: falling in love ® Embossing Folders: falling petals ® Embossing Powders: clear Punches: tailored tag Framelits:  layering circles Thinlits: numbers (nsu) Accessories: basic pearls, lace doilies ®, sponge brayer

Will be back again soon with more cards

Love Annette x

Saturday, 7 July 2018

Beautiful Bouquet with Scattered Sequins

Well we've just come back for a lovely holiday in Yorkshire, the weather couldn't have been better and the company was fantastic. There was a lot crammed into a week and by the time we were heading home we all felt like we needed a rest. 

York it's self is a beautiful city with lots to do and see so we needed two days there to cover all we wanted to do. The railway museum is a must. The rest of the time we went to Whitby for the Abbey and then onto Scarborough which was unfortunately enfolded in a thick sea fog so we didn't stop there. We had a day in the Dales which are stunning and a day on the Moors it's amazing how one county has such contrasting landscape the rugged moors and then the beautiful dales. Obviously throughout this holiday there was a bit of shopping thrown in here and there so empty wallets when we got home.

In all these places there were plenty of steps to climb so lots of exercise was had by all.

Now onto the card I made a while ago for my son's and their wives, but I have just realised that for Stuart it wasn't very appropriate as unfortunately they were unable to spend their's together. Rachael was back and forwards to the hospital in Plymouth and Stuart was in Portsmouth. but they're now both home with a beautiful baby boy that wasn't due until the 31st July. 

It was the simplicity of the card that caught my eye on Pinterest and it was also quite easy to make. Die cutting, embossing, punching and a little stamping job done. 


The materials used are:
® = retired, (sab) = Sale-A-Bration (nsu) = not stampin’ up

Stamps: Beautiful Bouquet : Colours: Basic Gray, Pear Pizzazz, Whisper White Embossing folders: Scattered Sequins Dynamic Punches: Washi Tape ® Framelits: Bouquet Bunch, Layering Circles, Stitched Shapes Accessories: Bakers Twine ®, Basic Pearls


Inspired by Carol Arneson

Will be back again soon with more cards

Love Annette x

Saturday, 26 May 2018

Tailored Guy Greetings

Well I still find guy cards a struggle, but with the True gentleman suite and Guy Greetings stamp set this one came together quite easily.

I wasn't sure about getting any of this suite especially the punch but was glad I did. The card just came together with no headaches. Simple but effective.

I got my new catalogue from Stampin' Up! yesterday and it arrived while my lovely friend Peg was visiting, so it was great fun flicking through a few of the pages together.

I've now got to go through it more closely and decide what I'd like to get this year.  What a choice there is, too much for my small purse but I will keep looking and changing my mind for a few days before the much looked forward to 1st of June. When I can place my first order of the new year!!!


The materials used are:

Card stock: Chocolate Chip, Night of Navy, Very Vanilla
Ink: Chocolate Chip, Night of Navy
DSP: True Gentleman
Stamp sets: Guy Greetings, Truly Tailored
Framelits: Layering Circles, Stitched Shapes
Punches: Tailored Tag
Accessories: Grosgrain ribbon ®

® = retired, (sab) = Sale-A-Bration (nsu) = not stampin’ up
Will be back again soon with more cards

Love Annette x