Showing posts with label Subtle. Show all posts

Tuesday, 30 July 2019

Painted Seasons meets Beautiful Bouquet

Hi folks, well I've been busy lately getting some cards done for the next few weeks.

This one I  think is quite pretty and not too hard to make.


We have two anniversaries, for this month so I made them the same card as they don't see each other and once I'd made the first one, I liked it so much I made it again for the second, swapping the colours for the flowers.


Once done, I think I prefer the one on the left, what about you?
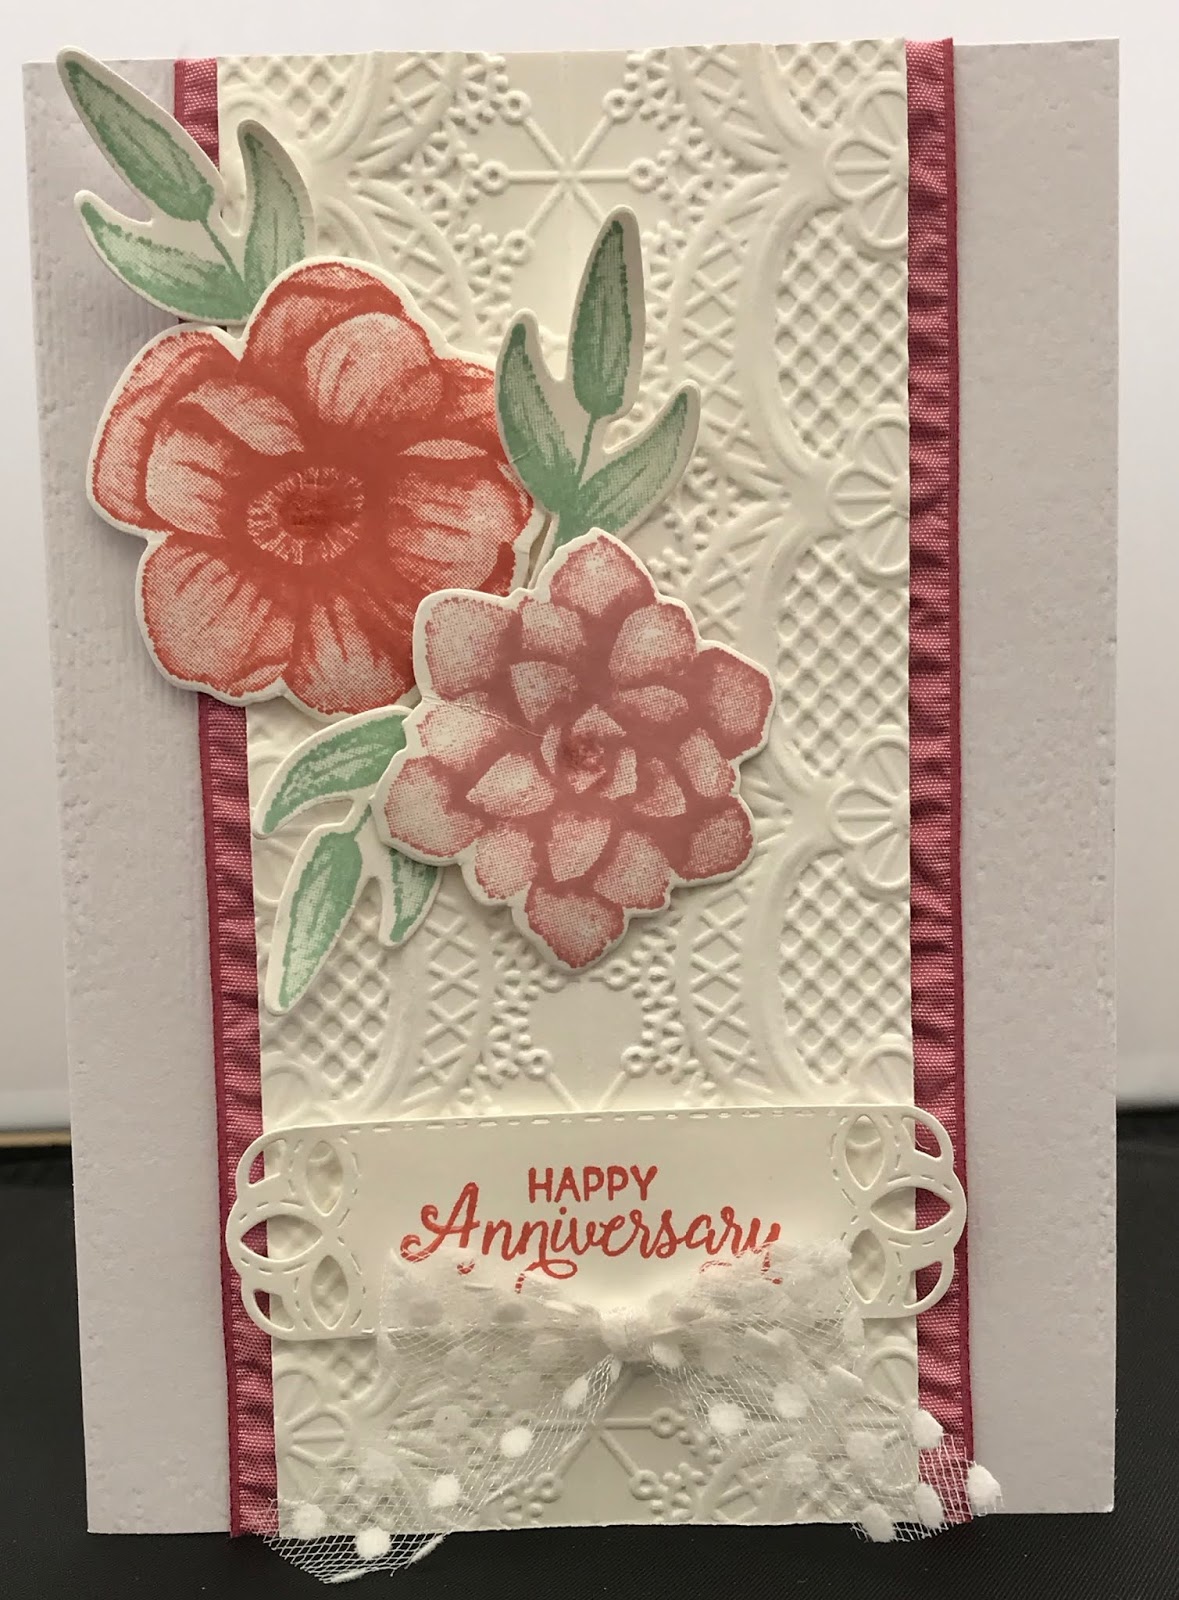


To recreate this card follow the guide below:
® = retired, (sab) = Sale-A-Bration, (H) = Hostess, (nsu) = not stampin’ up, (ss) = Stamp set, DSP = designer series paper, (cs) = Card Stock

Base card is Whisper White (cs) measuring 21 x 14.5cm scored at 10.5cm, then dry embossed using the Subtle folder.


Whisper White panel measures 14.5 x 6.5cm and is dry embossed using the Lace Dynamic folder. This is edged with some ® Rushed ribbon, adhered using double sided tape and then added to the base card using dimensional pads.


Using Whisper White (cs) stamp the 2 flowers from the ® Painted Seasons (ss) in Terracotta Tile and Rococo Rose (just love these new colours) and 3 of the leaves in Mint Macaron then die cut using the ® Four Seasons dies.


Stamp the sentiment from the Beautiful Bouquet (ss) and die cut using the peek a boo label die from the Stitched Labels dies.


Arrange the flowers and leaves on the card front and attach using dimensional pads along with the sentiment towards the bottom.


Finish off with a bow at the bottom using the Polka Dots Tulle ribbon.


Will be back again soon with more cards

Annette x

Wednesday, 24 July 2019

Frist Frost meets Stitched All Around

I love both these sets and yeah they've carried forward into the new catalogue along with their dies.

And it's all so easy to do, the new Distinctive stamps are great!!!!


To recreate this card follow the guide below:
cs = Card Stock, dsp = Designer Series Paper, ® = Retired

There is a base card of Rococo Rose (cs) measuring 21 x 14.5cm scored at 10.5cm.

Next a layer of Whisper White (cs) measuring 10 x 14cm and this is dry embossed using the Subtle folder.

With Whiper White (cs) stamp the sentiment from the Stitched All Around (ss) in Rococo Rose ink and die cut using the Stitched Labels dies.

Again with Whisper White stamp the flowers from the First Frost (ss) in Rococo Rose and Terracotta Tile ink and die cut using the Frosted Bouquet dies.

Now die cut 2 sprigs in Old Olive (cs) and 3 of the leaves in Vellum using the Frosted Bouquet dies.

Adhere the Whisper White  background layer to the base card.

Arrange the sprigs and leaves at the back of the sentiment and adhere down. I split them into smaller pieces to do this (I adhered them down using liquid glue and secured with sellotape).

Use dimensional pads to attach to the card, then again use dimensional pads to attach the flowers and add the Sequins ®.

Hope you liked todays card.
Back again soon with more cards
Annette x

Thursday, 27 June 2019

Layering love meets Beautiful Bouquet

Welcome to my world of crafting.

This is the second anniversary card for this month and it's for my oldest son and his lovely wife.

Not the same as the one earlier in the month, but I did use the open hearts from that card in the making of this one.


To recreate this card follow the guide below:
® = retired, (sab) = Sale-A-Bration, (H) = Hostess, (nsu) = not stampin’ up, (ss) = Stamp set, DSP = designer series paper, CS = Card Stock

The base card is a top fold, Thick Whisper White (cs) measuring 10.5 x 29.7 cm, scored at 14.85 cm.

The strip of ® Bride dsp at the bottom measures 10.5 x 2.5 cm and is adhered using liquid glue.

Using the Stitched Be Mine dies, cut the large scalloped heart in Grapefruit Grove with the next heart down, layered inside it. (you now have 2 hearts)

Using the ® Stitched Be Mine(ss) stamp the sentiment,  Live Laugh Love onto Whisper White (cs) in  Grapefruit Grove and repeat the die cutting process carried out for the Grapefruit Grove hearts (you now have 4 hearts, 2 white and 2 Grapefruit Grove).

Dry emboss the Whisper White heart using the Subtle embossing folder.

Again using the Stitched Be Mine dies, and (sab) Grapefruit Grove Foil, die cut the open hearts.

Adhere the scalloped heart near the top of the base card using liquid glue, next adhere the open hearts using a sponge and liquid glue.

Attach the embossed heart using dimensional pads.

Now using the Beautiful Bouquet (ss) and Whisper White (cs)  stamp the Happy Anniversary in Grapefruit Grove, then using the Layering Ovals dies, die cut this sentiment and the corresponding scalloped oval in Grapefruit Grove.

Finally attach the scalloped oval to the sentiment oval using small dimensional pads and then adhere this to the card using liquid glue, attach 3 of the Foil hearts where you want them again using dimensional pads.

Job done!!

Upon refection I should have dry embossed the anniversary sentiment to match the heart.

Will be back again soon with more cards
Annette x

Sunday, 2 June 2019

Twinkle Twinkle meets Animal Outing new baby

Well today I was just looking back over some of my previous blogs and came across this one I was supposed to post back in January!!! would you believe. But somehow it got lost in the list and wasn't put up, but i like it, so decided to post it today. Hope you like it, I've left it as it would have gone up except for this paragraph.

Our family has become a little bigger today, my cousin's wife has just delivered a beautiful baby boy into the family and everyone is so happy for them.

As we knew she was having a boy I was able to get the card done a couple of weeks ago and after looking through my stamp sets for new babies I decided on using this one as the others seemed to be a bit dated now.  I'd seen it on Pinterest and CASd it (sorry I can't remember who's it is) but thank you.


To recreate this card follow the guide below:
cs = Card Stock, dsp = Designer Series Paper, ® = Retired

Start with a base card measuring 21 14.5cm scored at 10.5.
first layer is DSP measuring 9.7 x 13.7 and adhered straight down.
With some off cuts of whisper white and balmy blue stamp the Welcome, Kangaroo and Little one from the Animal Outings stamp set leaving room around each of them to do the die cutting.

Colour the kangaroo, I used my stampin' blends for this crumb cake and call me clover from my new blends as well as Ivory and nude from my old stash.
Using the Layering Circles for the soft foam scallop circle, Stitched Shapes for the two larger white circles, Stitched Labels for the little one circle and small heart. Wood Crate for the heart. All of these can be die cut at the same time.
Now die cut the Kangaroo using the Animal Friends dies.
Emboss the welcome circle and the larger circle using the Subtle folder.
Adhere the kangaroo to the larger circle using dimensional pads and ground him with a bit of colour.
Arrange the rest of the elements using a combination of wet glue and dimensional pads.
Add a ribbon.

Will be back again soon with more cards


Love Annette x


Sunday, 5 May 2019

Botanical Butterfly meets Bitty Birthdays

Hi all, hope you're feeling good today!!

Todays card is a very simple one and so easy to make!

I've not made this person a card before, so hope she likes it, I sure did.


To recreate this card follow the guide below:
® = retired, (sab) = Sale-A-Bration, (H) = Hostess, (nsu) = not stampin’ up, (ss) = Stamp set, DSP = designer series paper, CS = Card Stock


Start with a base card of Whisper White (cs) measuring 14.8 x 21 cm scored at 10.5 (my base card is (nsu)).
This is followed by a mat of Whisper White (cs) measuring 10 x 14 cm and embossed using the Subtle folder, then adhered to the base card using liquid glue.

The next layer is a piece of our white Flax ribbon measuring 9.5 and each end folded and cut diagonally to form the V shape. This is attached to the card using glue dots about 8 cm from the bottom of the mat.

You now need two squares die cut using the Stitched Shapes framelits, the largest one with the Botanical Butterfly DSP and the next sized down one, using Whisper White (cs). Once this one is die cut emboss using the Subtle folder. Attach the whisper white one to larger dsp using dimensional pads then adhere the dsp square to the base card the same way (making sure the Subtle grain is vertical).

Cut a piece of Whisper White (cs) measuring 8.5 x 2 cm and stamp using the Birthday Wishes sentiment from the Itty Bitty Birthdays (ss) in Grapefruit Grove , use the Tailored tag punch to create the tails, emboss using the Subtle folder (with the grain going in a horizontal direction)  then adhere to the base card using dimensional pads.

Now fussy cut one of the butterflies form the Botanical Butterfly dsp and adhere it to the white square using liquid glue. (I used my Wink of Stella along the body and edges of the butterfly wings to add some sparkle.

To finish the card off just add 3 Gingham Gala adhesive backed Sequins!!!

hope you liked this card.

Will be back again soon with more cards.
Annette X


Tuesday, 30 April 2019

By the Bay meets Up Up and Away

Hi again, this is the second post for today, a day of two birthday's and this one is for a friend of ours. I'm not sure if the wash technique is my thing but will keep trying it to see if I can get any better with it. But over all I was pleased with the card.


To recreate this card follow the guide below:
(r) = retired, (cs) = card stock, (ss) = Stamp Set,(dsp = Designer Series Paper)

Base card, measures 14.8 x 21cm scored at 10.5cm
First layer, uses Wood Textures (dsp) and measures 14.8 x 10.5 cm and is adhered straight to the card with liquid glue.
Die cut some Watercolor Paper using the Rectangle Stitched framelits, the 5th smallest rectangle from the group of 8 and then stamp the image from the By the Bay (ss) using Black Stazon ink. I used the (r) Up Up and Away (ss) for the birds.
Using an Aqua Painter do a wash of Crumb Cake across the image and then again in Balmy Blue for the sky.
Using the Rectangle Stitched framelits create a frame in Basic Black using the 5th and 6th smallest rectangles from the group of 8.
Now run this frame through the Big Shot using the Subtle embossing folder.
Adhere the frame on the left hand side of the card using liquid glue and then adhere the image the same way.
With Very Vanilla Thick (cs) heat emboss the sentiment from the Vertical Greetings (ss) using VersaMark and Black Embossing Powder.
Use the Tailored Tag punch for the sentiment tails and then dry emboss using the Pinewood Planks folder. Adhere to the card with dimensional pads.
Add some Black Rhinestones across the bottom!!

Will be back again soon with more cards
Annette X

Beautiful You meets Heart & Stars

Well today I have two posts for you as I have two birthdays today, the first being my beautiful Granddaughter.

This card is based on one I saw ages ago on Pinterest but I can't remember who originally made it (sorry).


To recreate this card follow the guide below:
(r) = retired, (sab) = Sale-A-Bration, (h) = Hostess, (nsu) = not stampin’ up, (ss) = Stamp set, (dsp) = designer series paper, (cs) = Card Stock

Start with a base card of Whisper White measuring 21 x 14.5 cm and score at 10.5 cm
The next layer is Night of Navy measuring 10.25 x 14.25 cm. Adhered using liquid glue.
The next layer is Flirty Flamingo measuring 10 x 14 cm. This is sponged using the Hearts & Stars decorative masks in Flirty Flamingo ink, once sponged emboss using the Subtle folder and again adhered to the card using liquid glue.
On a piece of Thick Whisper White stamp one of the images from the Beautiful You (ss) using Memento tuxedo black ink.
On a piece of normal Whisper White stamp a sentiment from the same (ss) using Night of Navy ink.
Die cut both these images using the Stitched Shapes framelits and at the same time die cut a scalloped oval from the Layering Ovals framelits in Flirty Flamingo to use as a border for the sentiment. I sponged the edges of the scalloped oval in Flirty Flamingo for added dimension.
Attach the sentiment to the scalloped oval using dimensional pads. Now attach to the card, again using dimensional pads.
use Stampin' Blends to colour in the lady.
The ribbon behind the picture is a combination of retired Stitched Satin and Polka Dot Tulle, I used Snail tape to adhere the ribbon to the back of picture and then dimensional pads to attach the card.
To add a little dimension to the lady add some Wink of Stella along the black lines of the dress and hat.
To finish off I added some Rhinestones to the centre of each of the hearts and above the i on the sentiment which hides the dot.

Will be back again soon with more cards!!

Love Annette x

Monday, 29 April 2019

Epic Celebrations meets Gorgeous Grunge

Wasn't sure what to do again, as this is for a teenage boy, so I looked at my stamp sets, old and new and thought this was the only one I've got that's age appropriate. so what I'll do next year I don't know? Football again probably!!!


To recreate this card follow the guide below:
® = retired, (sab) = Sale-A-Bration, (h) = Hostess, (nsu) = not stampin’ up, (ss) = Stamp set, (dsp) = designer series paper, (cs) = Card Stock

Start with a base card of Real Red (cs) measuring 21cm x 14.5cm scored at 10.5 cm.

There are two mats, the first mat is Basic Black measuring 10. cm x 14 cm and adhered straight to the base card with liquid glue.
The second mat is Whisper White (cs) measuring 9.5 cm x 13.5 cm, this is stamped using the Gorgeous Grunge (ss) and then embossed using the Subtle folder. This is also adhered to card using liquid glue.
Using a scrap piece of Whisper White (cs) and the Epic Celebrations (ss) stamp the sentiment using VersaMark and heat emboss using Silver embossing powder. Punch out the sentiment using the Tailored Tag punch, then with Real Red (cs) stamp the edge of the "To A Classy kind of guy" stamp from the Truly Tailored (ss) in Basic Black ink and punch out using the Tailored Tag punch.
Now on another piece of Whisper White (cs) stamp the Headphones, guitar and sneakers from the Epic Celebrations (ss) using Memento Tuxedo Black ink. Colour them all using Stamping' Blends (black, real red and smoky slate).
Once coloured in add some VersaMark along the edges of the sneakers, around the rim of the headphones and along the one bar of the guitar and heat emboss using Silver embossing powder. Now fussy cut them ready to go on the card.
Cut the red Tailored tag in half down the long edge and adhere to the sentiment using liquid glue. Position the elements where you want them and adhere down using dimensional pads.
For the wire use black Bakers Twine adhered down using  a small amount of liquid glue.


Will be back again soon with more cards!!

Love Annette x

Monday, 8 April 2019

Create a Cupcake meets My Party

Well today is my Grandson's girlfriends birthday and here's the card I made for her. I made it a few weeks ago, took the picture, drafted the blog and Wow!!! got a shock. Went to give it to Kieran to give to her and found out it's her 21st, so just imagine a lovely 21 in the the top lefthand corner. Glad I hadn't sealed it down.

This is the second time I've missed a big one lately so hubby suggested I update my database to include their age as well as their day. So no sooner said than done, now I know everyone's age and won't miss another big one.


To recreate this card follow the guide below:
® = retired, (sab) = Sale-A-Bration, (h) = Hostess, (nsu) = not stampin’ up, (ss) = Stamp set, (dsp) = designer series paper, (cs) = Card Stock

Start with a base card of Thick Whisper White measuring 21cm x 14.5cm scored at 10.5 cm.

Create a full mat for the front measuring 10.5 cm x 14.5 cm using It's My Party ® (dsp) and adhere using liquid glue.
With a scrap piece of Whisper White (cs) and using the Rectangle Stitched framelits, die cut the 3rd smallest rectangle from the group of eight and emboss it using the Subtle folder.
Using a scrap piece of Sahara Sand (cs) die cut the 4th smallest frame from the same group layered up with the 3rd so there's an open aperture to place the Whisper White one inside.
Now on another piece of Whisper White (cs) stamp the pieces for the cupcake using the Sprinkles of Life ® (ss) then fussy cut the base of the cupcake and use the Tree builder ® punch for the top, add some sprinkles from the the same set in both Melon Mambo and Crushed Curry. 
Brush with Wink of Stella round the outside of the topping for some sparkle. Adhere the base of the cupcake within the frame using liquid glue and dimensional pads for the topping.
Next is the happy birthday sentiment which is taken from the Create A Cupcake ® (ss) stamped it in Melon Mambo and punched out using the Classic Label punch, then embossed using the Subtle folder, adhere on the left side with liquid glue, and on the right with a dimensional pad.
Lastly add some interest with the It's My Party ® enamel dots.

Will be back again soon with more cards


Love Annette x

Monday, 11 March 2019

Simple Happy Birthday

Hello fellow crafters,

It's my brother in-law's birthday today and this is what I came up with.

Sometimes I like to go for clean and simple cards, and this is a great one. But if I did it again I'd go for a lighter background dsp as the Happy Birthday sentiment doesn't stand out very well. 


To recreate this card follow the guide below:
® = retired, (sab) = Sale-A-Bration, (H) = Hostess, (nsu) = not stampin’ up, (ss) = Stamp set, dsp = designer series paper, CS = Card Stock

Start with a base card of Whisper White (cs) measuring 13.5 X 27 cm scored at 13.5 cm.

Using the Subtle folder, emboss the front of the card base.
Using an off cut of Whisper White stamp the sentiment (nsu) in Soft Suede and emboss using the Subtle folder.
Cut 2 pieces of Neutrals dsp measuring 9 x 9 cm and adhere them to the base card using liquid glue and them set at a slight angle.
Die cut the Happy Birthday using Gold Foil and the Happy Birthday thinlits, and use dimensional pads to adhere to the dsp.
Punch out the sentiment using the Washi Label ® punch and use dimensional pads to adhere to the bottom left corner.


Will be back again soon with more cards


Love Annette x

Friday, 8 March 2019

Beautiful Bouquet meets Petal Palette

Wasn't sure what to do when it came to do this card, and this is what I came up with. I thought being the beginning of Spring a nice bright colour would be good. I'd picked out the stamp sets and decided on a colour and off I went, adding little touches here and there.


To recreate this card follow the guide below:
® = retired, (sab) = Sale-A-Bration, (H) = Hostess, (nsu) = not stampin’ up, (ss) = Stamp set, DSP = designer series paper, CS = Card Stock

Start with a base card of Whisper White (cs) measuring 14.8 x 21 cm scored at 10.5cm
Randomly stamp the small flowers from the Petal Palette (ss) in So Saffron ink around the edge of the base card to give some added interest.
Now using a piece of  Whisper White (cs) stamp the bird from the Petal Palette (ss) in Smoky Slate, using the light Mango Medley blends add some colour to the birds breast.
The Sentiment is from the Beautiful Bouquet (ss) and stamped onto So Saffron (cs) in Smoky Slate. Make sure you leave enough space around the stamping to be able to die cut both of these later.
For the first layer use So Saffron (cs) measuring 14.8 x 5.8 cm and emboss using the Petal Pair folder, I used the Tailored Tag punch to create the tail. Use liquid glue to adhere to the base card.
Now the easy part, all the die cutting can be carried out in one pass through the Big Shot 
Cut some Silver Foil to fit the heart from the Sunshine Wishes thinlits and the lattice work from the Petals & More thinlits and place them on your big shot plate, along with the leaves in Soft Sea Foam, the bird that was stamped earlier and the single banner from the Bunch of Banners framelits to cut the sentiment. Use a small piece of So Saffron for the small heart from the Support Ribbon framelits,  Once all positioned on the plate run through your big shot.
Emboss the small heart using the Subtle folder.
Now place the pieces where you want them on the card and adhere down using a mixture of liquid glue and dimensional tabs.
Add a small bow to the lattice work along the bottom. I used some of the Taffeta ⅜" ® I had in my stash.


Will be back again soon with more cards

Love Annette x

Friday, 8 February 2019

Swirly Bird meets oldie Wacky Wishes

Well I decided today to make two cards at the same time, as they are people who don't know each other. 

It's a really easy card to make and there's only stamping and dry embossing involved. I liked the wacky wishes happy birthday but there are plenty of alternatives in the current catalogue. I need to use old stamp sets sometimes to justify keeping them or hubby moans!!! Plus I like them.


To recreate this card follow the guide below:
® = retired, (sab) = Sale-A-Bration, (H) = Hostess, (nsu) = not stampin’ up, (ss) = Stamp set, DSP = designer series paper, CS = Card Stock

Start with a base card of Crumb Cake measuring 29 x 10.5cm scored at 14.5cm
The first layer also Crumb Cake measures 14 x 10cm and is embossed using the Pinewood Planks folder. Once embossed adhere straight to the base card using liquid glue (Tombow).
The second layer Very Vanilla  measures 12.5 x 8.5cm, stamp across the bottom using the Swirly Bird (ss) with Crumb Cake and Night of Navy ink, then towards the top, stamp the sentiment from the Wacky Wishes ® (ss) in Night of Navy
Once stamped emboss this layer using the Subtle folder, add ribbon at the top and tie with a faux knot or if you're going to be posting the card use a staple to attach it, then adhere to the card using dimensional pads.


Will be back again soon with more cards

Love Annette x

Thursday, 24 January 2019

Star of Light meets Butterfly Gala

We had a covering of snow yesterday which at the time looked lovely, but today it's now not so good and the weather is dull and miserable but not quite so cold.

I made this card for my granddaughter, unfortunately I still didn't have the Butterfly Gala bundle so had to use the Papillon Potpourri stamp set along with the matching butterfly punches. But you can now do the same card with the butterfly gala stamp set and coordinating punch (it's a must have for me).


To recreate the card follow the guide below. 
® = retired, (sab) = Sale-A-Bration, (H) = Hostess, (nsu) = not stampin’ up, (ss) = Stamp set, DSP = designer series paper, CS = Card Stock


Base card of thick Whisper White measuring  4⅛ X 8⅜.
First layer Basic Black  8¼ x 4
Second layer In Color DSP 3½ x 7¾, 
Third layer powder pink 3¼ x 7½ and stamped using the Swirl from the Star of Light (ss) twice, rotating it 180 degree's for the second one, then emboss using the subtle folder.
Use an off cut of Powder Pink CS to stamp the butterflies from the Butterfly Gala (ss) using Berry Burst and punch them out using the Butterfly Duet punch, you will need 2 small butterflies and 1 larger butterfly.
Using the Sparkle glimmer paper cut a piece large enough for the sentiment Sweet from the Cupcake Cutouts framelits and add adhesive sheeting to the back for easier sticking
Die cut the sentiment and numbers from the Large Numbers ® framelits. 
Now adhere the layers of the card using your preferred glue, then place the sweet sentiment where you want it to be and add dimensional pads to the numbers and place them where you want them to be then add the butterflies. 
Adorn the the butterflies with basic pearls and add a bow.

Will be back again soon with more cards


Love Annette x

Saturday, 3 November 2018

Very Vintage

Well can you believe it, I nearly forgot to do my sister in law a birthday card this year. I went to my box of completed cards to pick it out to give to her and there wasn't one there!!! So what do I do in half an hour.

Get a base card of whisper white 10.5 x 14.5, Then a layer of Highland Heather 14 x 10 (i die cut the larger oval from this piece)  followed by a layer of Sahara Sand 13 x 9 embossed with the basket weave folder. Next i randomly stamped round the edge of the larger oval with the round stamp from the very vintage set in highland heather.  Die cut the white oval and stamped it with the large flower from the very vintage set, then embossed this with the subtle folder. Next I stamped the happy birthday on a scrap of whisper white, punched it out using the classic label punch and ran it through the big shot again using the subtle folder. Added a bow using the narrow organza ribbon. Done!!!


The materials used are:
® = retired, (sab) = Sale-A-Bration (nsu) = not stampin’ up

Stamps: Very Vintage Colours: Highland Heather, Sahara Sand Embossing Folders: Basket Weave, Subtle Punches: Classic Label Framelits: Ovals Collection ® Accessories: ¼” Organza Ribbon ® 

Will be back again soon with more cards

Love Annette x

Saturday, 20 October 2018

Perennial Waterfront

This was a simple card to make using the waterfront stamp set as the main feature. 

There are 4 layers to the card, first a white base, then blueberry bushel followed by shaded spruce and finally a white layer that I just stamped from the top down using the waterfront set and then stamped the happy birthday from the perennial birthday set at the very bottom. After stamping, I embossed this layer using the subtle folder, then added the grosgrain ribbon and the die cut Son (nsu).


The materials used are:
® = retired, (sab) = Sale-A-Bration (nsu) = not stampin’ up

Stamps: Perennial Birthday, Waterfront Colours: Balmy Blue, Blueberry Bushel, Old Olive, Shaded Spruce, Whisper White Embossing Folders: Subtle Accessories: Grosgrain Ribbon ® 

Will be back again soon with more cards

Love Annette x