Tuesday 28 May 2019

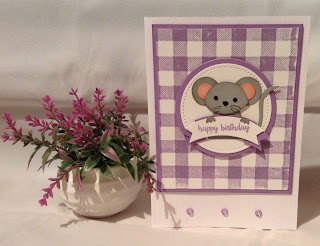
Fox Builder Punch meets Happy Birthday Gorgeous

Hello Folks,

This is a very easy card to make, and fun to do. I believe it was on Julie's Japes the Paper Haven blog.


To recreate this card follow the guide below:
® = retired, (sab) = Sale-A-Bration, (H) = Hostess, (nsu) = not stampin’ up, (ss) = Stamp set, DSP = designer series paper, (cs) = Card Stock

Base card measures 14.8 x 21cm scored at 10.5cm and dry emboss using the Subtle folder.

Highland Heather matt measures 9.5 x 11cm
Gingham Gala (dsp) measures 9 x 11cm
Highland Heather circle measures 7 x 7cm
Whisper White circle measures 6.5 x 6.5cm
Highland Heather & Whisper White banners measure 6.5 x 5cm
Smoky Slate measures 6.5 x 6.5cm

Dry emboss the front of the base card using the Subtle folder

Adhere the Gingham Gala (dsp) to the Highland Heather matt using liquid glue.

Use dimensional pads to attach this matt to the base card.

Die cut the 2 circles at the same time, using the Layering Circles dies for the larger one and the Stitched Shapes  dies for the smaller one. Adhere these together using liquid glue, then attach to the card using dimensional pads.

Now put the mouse together. 

Using the Fox Builder punch and Smoky Gray (cs) punch out 1 fox, then using Basic Black punch the smaller nose.
Punch 2 circles using a ¾" Circle punch in Smoky Slate
Using Owl Builder punch, punch the 2 larger circles in Blushing Bride (cs), the 2 feet in Smoky Slate and the 2 smallest circles in Basic Back (cs).

For definition sponge the edge of the all the pieces in corresponding ink.

Adhere all the pieces to the card base using liquid glue except for the head and feet.

Stamp the happy birthday from the Happy Birthday Gorgeous (ss) and punch out using the Duet Banner Punch. Punch a second banner in Highland Heather and layer these together using small dimensional pads. Add the owls feet as hands using liquid glue. Add this to the base card again using small dimensional pads.

Color 3 Basic Rhinestones using the Highland Heather Blends and add them across the bottom of the card.

Will be back again soon with more cards.
Annette x
Thursday 23 May 2019

Celebrate You meets Happy Birthday Gorgeous

Hi Friends, and welcome to my world.

For this card I'm using up some of my really old card stock and DSP, but it can be made easily with some of the current DSP, Card Stock and embellishments. 

Do you like my new Mothers Day present (I just love it) it's from my young grandson, who always gets granny a nice card and present,  as well as mummy.

I got lovely cards and presents, from all my beautiful children and Grandchildren. 

You may notice from previous posts Owls are one of my things and this pair are especially nice.


To recreate this card follow the guide below:
® = retired, (sab) = Sale-A-Bration, (H) = Hostess, (nsu) = not stampin’ up, (ss) = Stamp set, DSP = designer series paper, CS = Card Stock

Start with a card base of Early Espresso (cs) measuring 11 x 29 cm scored at 14.5 cm
River Rock® (cs) measuring 8 x 2.5 cm
Cajun Craze (cs) measuring 3.5 x 9.5 cm
Well Worn® DSP measuring 6.7 x 21 cm

Fold the DSP in half at 10.5cm, and with the open side on the right mark at 4cm up and cut diagonally to the top on the right hand side (this makes the wedge for both sides), then cut down the centre to get the 2 pieces and adhere to the base card using liquid glue.

Stamp the It's your day! from the Happy Birthday Gorgeous (ss) in Cajun Craze onto the River Rock (cs).

Die cut the Celebrate sentiment form the Celebrate You thinlits along with the stamped It's your day! using the larger label die from the Lakeside framelits at the same time.

Adhere the Celebrate using multipurpose adhesive sheet applied to the (cs) before die cutting.

Adhere the It's your day! using dimensional pads.

Add some Candy Dots for added interest!!

Will be back again soon, thanks for dropping by.

Annette X


Tuesday 7 May 2019

Beautiful Bouquet meets Beauty Abounds

Hi All, 

Well it looks like spring is on the way, it's a little warmer here in the West Midlands.


To recreate this card follow the  guide below:
® = retired, (cs) = card stock, (ss) = Stamp Set,(dsp) = Designer Series Paper

Start with a base card of Daffodil Delight measuring 14.8 x 21 cm scored at 10.5. 

Then a layer of  Old Olive (cs) measuring 10 x 14.3 cm, this is embossed using the Petal Burst folder.

On a piece of Whisper White (cs) measuring 12 x 4.5 cm and using the Beauty Abounds (ss) stamp the flowers in Old Olive.

Colour the flowers and leaves using Daffodil Delight and Call Me Clover Stamping'  Blends.

Now cut the flowers into 3 equal sections (each 4cm) adhere to the Old Olive layer using dimensional pads.

Adhere a strip of Daffodil Delight Organdy ribbon down the right hand side of the card using glue dots.

On Whisper White (cs) stamp the Happy Birthday from the Beautiful Bouquet (ss) in Daffodil Delight, then using the smaller of the group of circles in the Beauty Abounds (ss) stamp over the Happy Birthday (stamping off once first) in Daffodil Delight and Old Olive.

Die cut  the Happy Birthday using the smallest of the ovals from the Stitched Shapes Framelits and at the same time die cut the Smallest Scalloped Oval in Daffodil Delight from the Layering Ovals framelits.

Adhere the Happy Birthday sentiment to the scalloped oval using liquid glue. Then adhere this to the Old Olive card using dimensional pads.

Make a long tailed bow and adhere below the sentiment using glue dots.

Add some Rhinestones randomly down the flowers!!!

Will be back again soon with some more cards


Annette X

Sunday 5 May 2019

Botanical Butterfly meets Bitty Birthdays

Hi all, hope you're feeling good today!!

Todays card is a very simple one and so easy to make!

I've not made this person a card before, so hope she likes it, I sure did.


To recreate this card follow the guide below:
® = retired, (sab) = Sale-A-Bration, (H) = Hostess, (nsu) = not stampin’ up, (ss) = Stamp set, DSP = designer series paper, CS = Card Stock


Start with a base card of Whisper White (cs) measuring 14.8 x 21 cm scored at 10.5 (my base card is (nsu)).
This is followed by a mat of Whisper White (cs) measuring 10 x 14 cm and embossed using the Subtle folder, then adhered to the base card using liquid glue.

The next layer is a piece of our white Flax ribbon measuring 9.5 and each end folded and cut diagonally to form the V shape. This is attached to the card using glue dots about 8 cm from the bottom of the mat.

You now need two squares die cut using the Stitched Shapes framelits, the largest one with the Botanical Butterfly DSP and the next sized down one, using Whisper White (cs). Once this one is die cut emboss using the Subtle folder. Attach the whisper white one to larger dsp using dimensional pads then adhere the dsp square to the base card the same way (making sure the Subtle grain is vertical).

Cut a piece of Whisper White (cs) measuring 8.5 x 2 cm and stamp using the Birthday Wishes sentiment from the Itty Bitty Birthdays (ss) in Grapefruit Grove , use the Tailored tag punch to create the tails, emboss using the Subtle folder (with the grain going in a horizontal direction)  then adhere to the base card using dimensional pads.

Now fussy cut one of the butterflies form the Botanical Butterfly dsp and adhere it to the white square using liquid glue. (I used my Wink of Stella along the body and edges of the butterfly wings to add some sparkle.

To finish the card off just add 3 Gingham Gala adhesive backed Sequins!!!

hope you liked this card.

Will be back again soon with more cards.
Annette X


Friday 3 May 2019

Best Birds meets Dragonfly Dreams

I Was really pleased with the way this card turned out. 

It was created for my friend Peg using a lovely colour combo and it was also easy to make once I worked out the best way of doing the bokeh dots.


To recreate this card follow the guide below:
(r) = retired, (sab) = Sale-A-Bration, (h) = Hostess, (nsu) = not stampin’ up, (ss) = Stamp set, (dsp) = designer series paper, (cs) = Card Stock

Start with a base card of Highland Heather measuring 14.8 cm x 21 cm, scored at 10.5 cm.
The next layer is Whisper White measuring 14.8 cm x 10.5 cm, this is then embossed using the Tufted dynamic folder. Next wrap some of the Sale-A-Bration's Organdy ribbon around it and tie with a knot. Adhere this to the base card using liquid glue.
On a scrap piece of Whisper White and using the Stamparatus to be able to double stamp, stamp the Bokeh Dots in Balmy Blue, then wipe the stamp and stamp again in Highland Heather.
Stamp the dragonfly from the Dragonfly Dreams (ss) onto Vellum using Highland Heather twice.
Stamp 3 of the small flower head from the Best Birds (ss) again using Highland Heather, also stamp the sprig of leaves from the same set on Whisper White in Soft Sea Foam.
Now using the Rectangle Stitched framelits, die cut the bokeh dots with the 3rd smallest rectangle from the the group of eight while at the same time die cut one of the dragonflies using the Detailed Dragonfly thinlits, one of the flower heads and the sprig of leaves using the Birds & Blooms thinlits. Now die cut the second dragonfly and second flower head, followed by the third flower head.
For the sentiment stamp the happy birthday from the Happy Birthday Gorgeous (ss) using Highland Heather, this is then attached to the card using dimensional pads.
Now using liquid glue adhere the two dragonflies together down the centre spine only, then using a bone folder slightly curl the top wings and place a small dimensional pad between the top and bottom wings where you can see the Rhinestones on the wings.
In the top left corner and using liquid glue adhere the top two leaves from the sprig just under the rectangle, now add the 3 flower heads using glue dots.
Finish off with more Rhinestones one in each of the flower heads and one in the centre of the dragonfly. Now scatter a few more Rhinestones around the card.

Will be back again soon with more cards!

Annette x


Thursday 2 May 2019

Animal Friends meets Well Said & Tufted

Hi everyone,

I just love this card and was inspired by one I had seen on Pinterest some time ago.

As you can see it's for my Grandson who was born 3 months early this time last year. He is now a gorgeous health little one year old. Happy Birthday darling xx


To recreate this card follow the guide below:
® = retired, (sab) = Sale-A-Bration, (H) = Hostess, (nsu) = not stampin’ up, (ss) = Stamp set, DSP = designer series paper, CS = Card Stock

Start with a base card of Whisper White (cs) measuring 17.5 x 25 cm scored at 12.5 cm. (my base card is nsu)

This is followed by a layer of Lemon Lime Twist (cs) measuring 16.5 x 12 cm and adhered to the base card using liquid glue.

 The next layer is Animal Expedition (dsp) measuring 15.5 x 11 cm, embossed using the Tufted Dynamic folder. this is also adhered down using liquid glue.

With Whisper White (cs) stamp the Giraffe from the Animals Outing (ss) using Memento Tuxedo Black ink and colour using Mango Melody, Calypso Coral and Soft Suede Stamping' Blends.

With a thin strip of Whisper White (cs) stamp the Happy and Birthday from the Well Said (ss) then trim down to just fit.

There's some die cutting to be done now and this can all go through the big shot in one go.

Die cut the coloured in giraffe and small leaves in Lemon Lime Twist from the Animal Friends thinlits, the 2nd largest circle from the Stitched Shapes framelits along with the 1st and grandson using nsu dies, and old (sab) Bermuda Bay Glimmer Paper. (the alternative for the number is the Stamping' Up large number dies).

Adhere the number with liquid glue onto the circle then adhere the leaves and giraffe to the back of the circle again with liquid glue.

Use dimensional pads to adhere the circle to the base card, then the happy and birthday to the circle.

Back soon with more cards!!

Annette X