Monday 5 August 2019

Lilypad Lake meets Perennial Birthday

Lilypad Lake meets Perennial Birthday

Well Perennial Birthday seems to be my go to stamp set for birthdays at the moment. Especially for male cards.

These two cards are the same except for the Enjoy sentiment, I couldn't decide which one to use so did one of each. I'm veering towards the red on white, which do you prefer?


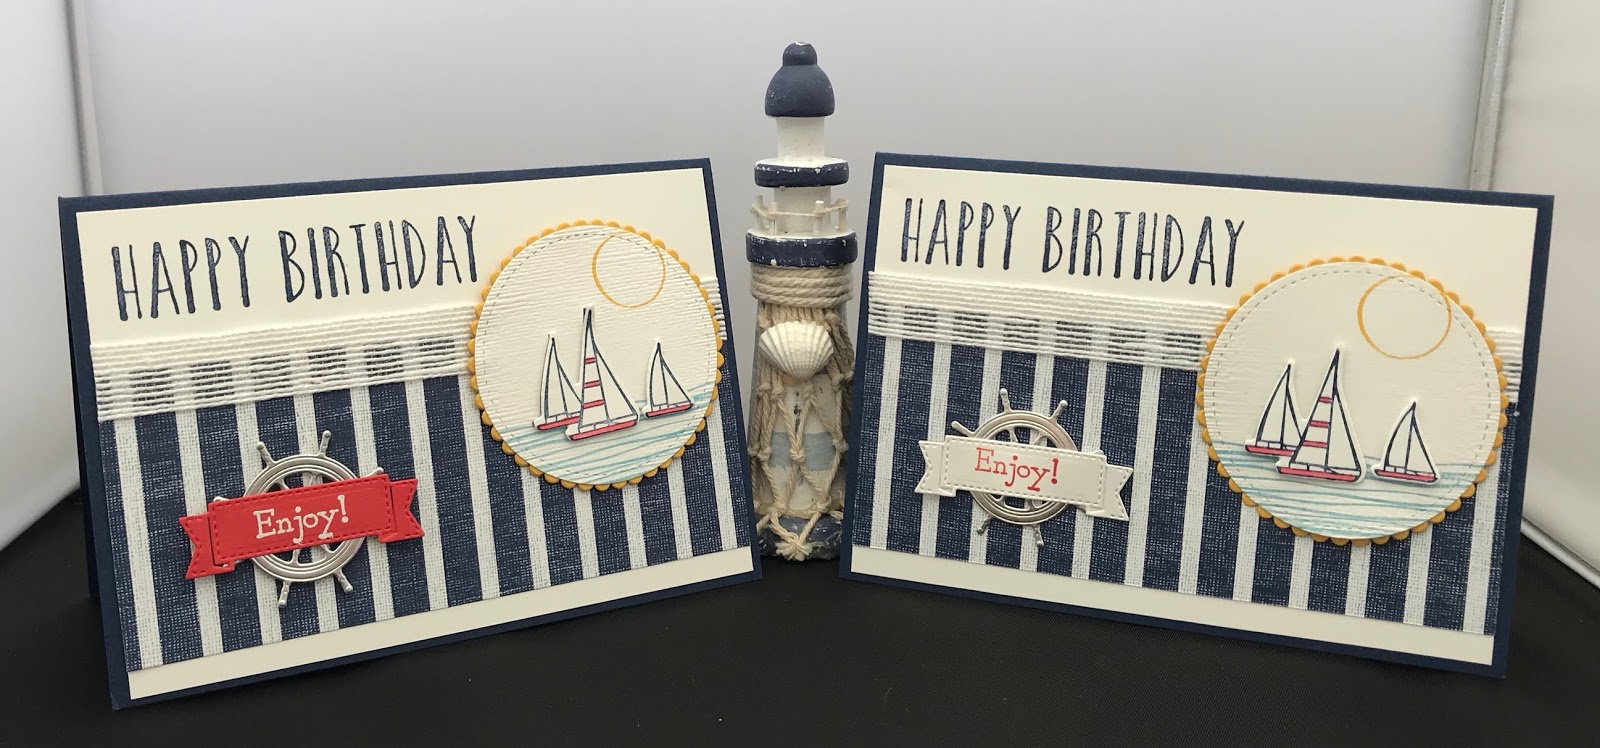
It's quite an easy card to make (I don't do hard cards) ha ha!!

To recreate this card follow the guide below:
® = retired, (sab) = Sale-A-Bration, (H) = Hostess, (nsu) = not stampin’ up, (ss) = Stamp set, (DSP) = designer series paper, (CS) = Card Stock,
when working with layering dies I start with the largest and work down (ie: the largest is number 1 and the smallest 4).

Card Stock and measurements: (Centimetres)
Night of Navy: 21 x 14.5scored at 10.5
Whisper White: 4 pieces, 14.3 x 10, 4.5 x 3.5, 5.5 x 2, 6.5 x 6.5
Crushed Curry: 7 x7
Silver Foil: 4 x 4
Come Sail Away DSP: 14.3 x 6
Flax Ribbon: 14.3
Embossing Folders: Subtle
Dies: Layering Circles, Lakeside, Smooth Sailing,  Stitched Shapes
Stamp Sets: Bella & Friends ®, Lilypad Lake, Perennial Birthday, Sailing Home
Stampin' Blends: Poppy Parade
Stampin' Pads: Balmy Blue, Crushed Curry, Night of Navy, Poppy Parade

Stamp the happy birthday in the top left corner of the Whisper White layer in Night of Navy.
Adhere the DSP about 0.5 from the bottom of the same layer using liquid glue.
Add the ribbon at the top of the DSP half on half off, and adhere using tear n tape.
On the square of Whisper White,  stamp the waves at the bottom, then the yachts (don't worry about the overlay) and lastly the sun towards the top (make sure it's not too high up.
On the smallest piece of Whisper White stamp the Enjoy sentiment in Poppy Parade.
On the last piece of Whisper White stamp the yachts again in Night of Navy.
Now colour in the sails using the blends.
Place all items to be die cut on your plate together. Silver Ships Wheel, Crushed Curry scalloped circle No:4, yacht scene Stitched Shapes circle No: 2, banner, separate group of yachts.
Adhere the yacht scene to the scalloped circle using liquid glue then attach to the base card using dimensional pads.
Overlay the yachts using dimensional pads.
Adhere the banner to the Helm using liquid glue and attach to the base card using dimensional pads.
Will be back again soon with more cards!!
Annette X

Tuesday 30 July 2019

Painted Seasons meets Beautiful Bouquet

Hi folks, well I've been busy lately getting some cards done for the next few weeks.

This one I  think is quite pretty and not too hard to make.


We have two anniversaries, for this month so I made them the same card as they don't see each other and once I'd made the first one, I liked it so much I made it again for the second, swapping the colours for the flowers.


Once done, I think I prefer the one on the left, what about you?


To recreate this card follow the guide below:
® = retired, (sab) = Sale-A-Bration, (H) = Hostess, (nsu) = not stampin’ up, (ss) = Stamp set, DSP = designer series paper, (cs) = Card Stock

Base card is Whisper White (cs) measuring 21 x 14.5cm scored at 10.5cm, then dry embossed using the Subtle folder.


Whisper White panel measures 14.5 x 6.5cm and is dry embossed using the Lace Dynamic folder. This is edged with some ® Rushed ribbon, adhered using double sided tape and then added to the base card using dimensional pads.


Using Whisper White (cs) stamp the 2 flowers from the ® Painted Seasons (ss) in Terracotta Tile and Rococo Rose (just love these new colours) and 3 of the leaves in Mint Macaron then die cut using the ® Four Seasons dies.


Stamp the sentiment from the Beautiful Bouquet (ss) and die cut using the peek a boo label die from the Stitched Labels dies.


Arrange the flowers and leaves on the card front and attach using dimensional pads along with the sentiment towards the bottom.


Finish off with a bow at the bottom using the Polka Dots Tulle ribbon.


Will be back again soon with more cards

Annette x

Wednesday 24 July 2019

Frist Frost meets Stitched All Around

I love both these sets and yeah they've carried forward into the new catalogue along with their dies.

And it's all so easy to do, the new Distinctive stamps are great!!!!


To recreate this card follow the guide below:
cs = Card Stock, dsp = Designer Series Paper, ® = Retired

There is a base card of Rococo Rose (cs) measuring 21 x 14.5cm scored at 10.5cm.

Next a layer of Whisper White (cs) measuring 10 x 14cm and this is dry embossed using the Subtle folder.

With Whiper White (cs) stamp the sentiment from the Stitched All Around (ss) in Rococo Rose ink and die cut using the Stitched Labels dies.

Again with Whisper White stamp the flowers from the First Frost (ss) in Rococo Rose and Terracotta Tile ink and die cut using the Frosted Bouquet dies.

Now die cut 2 sprigs in Old Olive (cs) and 3 of the leaves in Vellum using the Frosted Bouquet dies.

Adhere the Whisper White  background layer to the base card.

Arrange the sprigs and leaves at the back of the sentiment and adhere down. I split them into smaller pieces to do this (I adhered them down using liquid glue and secured with sellotape).

Use dimensional pads to attach to the card, then again use dimensional pads to attach the flowers and add the Sequins ®.

Hope you liked todays card.
Back again soon with more cards
Annette x

Sunday 30 June 2019

Chalk Talk meets Falling Flowers

Hi Folks, it's a lovely day here today, hope its nice where you are!!

Todays card is a blast from the past, with a another retiring stamp set. I CASed it from one I'd seen on  Pinterest by Stampin fun with Selene.


To recreate this card follow the guide below:
® = retired, (sab) = Sale-A-Bration, (H) = Hostess, (nsu) = not stampin’ up, (ss) = Stamp set, DSP = designer series paper, CS = Card Stock

Start with a base card of Whisper White (cs) 7" x 10" scored at 5" (my base card is (nsu).

You now need a piece of Basic Black (cs) measuring 4" x 5½" and the Falling Flowers ®  (ss) along with the Stitched Rectangle dies.

I found For this stage my Stamparatus gave me excellent placement for the image, which is  stamped using VersaMark then heat embossed with White Embossing Powder.

Once embossed layer the largest and 3rd largest of the rectangles over it and die cut (you now have 3 pieces). Starting with the outer frame adhere to the base card using liquid glue, then do the same with the middle frame making sure there are no gaps. Wrap some of the White Organza Ribbon ® round the 3rd frame and secure it. Now adhere in the middle of the card using liquid glue and making sure again there are no gaps.

For the last stage you need Whisper White (cs) measuring at least 2½" x 3¾", Chalk Talk ®  (ss) and the Chalk Talk ®  dies.

Use the Stamparatus again for the topper and Memento Tuxedo Black ink, as it will probably need a couple of layers of ink (depending on how juicy your ink pad is). Once stamped die cut it and adhere to the card using dimensional pads.

Make a bow with some of the Organza Ribbon and adhere to label using a dimensional pad, then add some random Candy Dots ®.

Don't worry it's not as hard to make as it sounds.

Will be back again soon with more cards.
Annette x

Saturday 29 June 2019

Beautiful Bouquet meets Bouquet Bunch

Well Jenny's big day has arrived.

From 5:00pm tonight all our children will be married, she's so excited and so are her daughters, who are going to be bridesmaids.

It's 8.30 now and I'm enjoying my last few minutes of tranquility before they all arrive to get ready!

As for the card I went for simple and stylish. There's a lot of my old stash in this one.


I was inspired by a card made by Lou Katzelman

To recreate this card follow the guide below:
® = retired, (sab) = Sale-A-Bration, (H) = Hostess, (nsu) = not stampin’ up, (ss) = Stamp set, (DSP) = designer series paper, (CS) = Card Stock

Start with  a card base of Whisper White (cs) 17.5 x 25 cm scored at 12.5 cm
(my base card is (nsu)
Bride ® (dsp) measuring 12.3 x 17 cm
Silver Foil measuring 7 x 7 cm
Window sheet measuring 7 x 7 cm
Gorgeous Grape (cs) measuring 3.5 cm x 16.5 cm
Whisper White (cs) measuring 3.5 x 11.5 cm
Sahara Sand (cs) measuring 7 x 9.5 cm
  • Make a window in the Bride ®  (DSP) using the 2 largest square shapes from the Stitched Shaped framelits 
  • Place the (DSP) on top of the base card and using a light pencil, mark out the square on the base card
  • Stamp the sentiment from the Beautiful Bouquet (ss) in Basic Grey inside the marked square then remove the pencil mark
  • Stick the piece of Window Sheet at the back of the Bride (DSP) using Tear and Tape
  • Adhere Foam Adhesive Strips around the window and along the edges of the (DSP) 
  • Remove the backing from the strips at the bottom of the card and the bottom 3 sides of the square  but not the top of the square or card to the base card
  • Insert the sequins into the square then remove the rest of the backing  paper and adhere the rest of the card down
  • On the strip of Whisper White  Mr & Mrs from the Beautiful Bouquet (ss) in Basic Grey 
  • Die cut the Mr & Mrs Using the Bouquet Bunch framelits die then die cut 3 fern leaves in Silver Foil, 3 small flowers in Whisper White, 4 small flowers in Gorgeous Grape, 1 larger flower in Gorgeous Grape and the stems in Sahara Sand
  • Wind the metallic thread round the stems attaching the Mr & Mrs label and adhere to the card using liquid glue
  • Add the 3 ferns, then the 3 white flowers, then the 4 small purple flowers also with liquid glue then larger flower in the middle using small dimensional pads and adding the Rhinestones as the flower centres. (Instead of rhinestones I used some small beads  I have in my stash.
Will be back with more cards soon
Annette X

Thursday 27 June 2019

Layering love meets Beautiful Bouquet

Welcome to my world of crafting.

This is the second anniversary card for this month and it's for my oldest son and his lovely wife.

Not the same as the one earlier in the month, but I did use the open hearts from that card in the making of this one.


To recreate this card follow the guide below:
® = retired, (sab) = Sale-A-Bration, (H) = Hostess, (nsu) = not stampin’ up, (ss) = Stamp set, DSP = designer series paper, CS = Card Stock

The base card is a top fold, Thick Whisper White (cs) measuring 10.5 x 29.7 cm, scored at 14.85 cm.

The strip of ® Bride dsp at the bottom measures 10.5 x 2.5 cm and is adhered using liquid glue.

Using the Stitched Be Mine dies, cut the large scalloped heart in Grapefruit Grove with the next heart down, layered inside it. (you now have 2 hearts)

Using the ® Stitched Be Mine(ss) stamp the sentiment,  Live Laugh Love onto Whisper White (cs) in  Grapefruit Grove and repeat the die cutting process carried out for the Grapefruit Grove hearts (you now have 4 hearts, 2 white and 2 Grapefruit Grove).

Dry emboss the Whisper White heart using the Subtle embossing folder.

Again using the Stitched Be Mine dies, and (sab) Grapefruit Grove Foil, die cut the open hearts.

Adhere the scalloped heart near the top of the base card using liquid glue, next adhere the open hearts using a sponge and liquid glue.

Attach the embossed heart using dimensional pads.

Now using the Beautiful Bouquet (ss) and Whisper White (cs)  stamp the Happy Anniversary in Grapefruit Grove, then using the Layering Ovals dies, die cut this sentiment and the corresponding scalloped oval in Grapefruit Grove.

Finally attach the scalloped oval to the sentiment oval using small dimensional pads and then adhere this to the card using liquid glue, attach 3 of the Foil hearts where you want them again using dimensional pads.

Job done!!

Upon refection I should have dry embossed the anniversary sentiment to match the heart.

Will be back again soon with more cards
Annette x

Monday 17 June 2019

Beautiful You meets Swirly Frames

Quick 'n' simple, Well I took a card created by Amanda Charlesworth and used different colours to use up some of my retired stash then jazzed it up with some ribbon and sparkle.


To recreate this card follow the guide below:
(r) = retired, (sab) = Sale-A-Bration, (h) = Hostess, (nsu) = not stampin’ up, (ss) = Stamp set, (dsp) = designer series paper, (cs) = Card Stock

You will need:

Whisper White card base 10.5 x 29.7 cm scored at 14.85 cm.
Falling in Love (r) (dsp) measuring 11.5 x 8 cm.
Silver Foil measuring 11 x 7.5 cm.
Whisper White measuring 11 x 7.5 cm.
Beautiful You (ss) and Swirly Frames (ss).
Soft Sky ink (r), VersaMark.
Seam Binding (r) ribbon.
Aqua Painter, Stamparatus, Pinewood Planks embossing folder, Silver embossing powder, basic Rhinestones.

Emboss the front of the base card using the Pinewood Planks folder.
Adhere the silver foil to the dsp using liquid glue.
Cut a 4' strip of the ribbon, fold in half and cut a banner shape at each end and adhere towards the bottom of the silver foil.
Adhere this to the base card at a slight angle.
Prep the piece of whisper white (cs) using an embossing buddy and stamp the lady, rectangle frame and sentiment using versamark and heat emboss with silver powder.
Add a wash of colour using Soft Sky across the dress and hat.
Trim round the edge of the frame, add dimensionals to the back and adhere to the card.
Finish off with a few Rhinestones.

Will be back again soon with more cards

Annette X

Sunday 16 June 2019

Geared Up Garage Suite

This is a fabulous suite of goodies and I've only just realised it, now some of it has gone, thanks to the new Catalogue. But what the heck if you've got it, use it. Thats what I say.

I did some fussy cutting (not my thing), stamping, die cutting and dry embossing and it was so much fun and quick.


To recreate this card follow the guide below:
® = retired, (sab) = Sale-A-Bration, (H) = Hostess, (nsu) = not stampin’ up, (ss) = Stamp set, DSP = designer series paper, (cs) = Card Stock

Start with a base card of Whisper White (cs) measuring 21 x 14.5, scored at 10.5cm.

Next have a layer of Tranquil Tide (cs) measuring 10 x 14cm and adhere this to the front of the base card.

The Top layer is Whisper White (cs) measuring 9.5 x 13.5cm. On this layer randomly stamp the nuts from the Geared Up Garage (ss) in Tranquil Tide and Smoky Slate ink, using third and fourth generation stamping. Then dry emboss using the ® Seaside folder, and adhere to the front of the card (there are now 3 layers).

Using Whisper White (cs) stamp the Happy Father's Day sentiment from the Geared Up Garage (ss) Using VersaMark topped with Tranquil Tide ink and heat emboss with Clear Embossing Powder.

With the ® Classic Garage (dsp) fussy cut one of the Tranquil Tide engines (at least I think it's an engine) and adhere where required.

Now for the die cutting, using the Garage Gears dies, die cut the sentiment with the appropriate die, the label needs to be in Tranquil Tide and the gears need to be in Silver Foil. These can all be die cut at the same time.

Attach the pieces to the card where you want them and then add the ® Garage Metal Element.

Hope you liked today's card.

Will be back again soon with more cards
Annette x

Thursday 6 June 2019

Stitched Be Mine meets Beautiful Bouquet

Hello, and thanks for dropping by today!!

It's June now and so there are 2 anniversaries and one Wedding this month along with 2 birthdays. 

All three of my children decided June was the month to get married so here's the first.

My youngest son is now celebrating his 4th anniversary and here's the card I made for them both. It's just a shame they can't spend it together as he's in the Navy and up North at the moment.


To recreate this card follow the guide below:
® = retired, (sab) = Sale-A-Bration, (H) = Hostess, (nsu) = not stampin’ up, (ss) = Stamp set, DSP = designer series paper, CS = Card Stock

Start with a base card of Thick Whisper White (cs)  measuring 21 x 14.5 scored at 10.5 cm.

Next came 2 pieces of the Bride dsp ® measuring 10.5 x 4 cm, these pieces are cut using the scalloped edgelit from the Stitched Be Mine die set. (make sure you line the edgelit as close as you can to the edge of the dsp. Adhere using liquid glue.

Again with the Stitched Be Mine dies, cut out the 3rd smallest of the stitched hearts using the Bride dsp, the fancy heart, the straight line scroll and the open hearts using Grapefruit Grove Foil (sab).

Position the Bride dsp heart in the middle of the card and adhere down with liquid glue, sponge the back of the fancy heart with liquid glue and adhere over the top of the dsp heart. In the same way adhere the straight scroll below the scalloped edge at the bottom.

Take 2 of the popped out hearts and using small dimensional pads adhere where required.

On a piece of Whisper White (cs)  and using the Beautiful Bouquet (ss) stamp the sentiment in VersaMark and heat emboss using Copper embossing powder.

Using the Layering Ovals dies, die cut the sentiment and corresponding scalloped oval again in Grapefruit Grove foil (sab). Layer up these with dimensional pads and adhere to the card with liquid glue.

Will be back again soon with more cards.
Annette x

Sunday 2 June 2019

Twinkle Twinkle meets Animal Outing new baby

Well today I was just looking back over some of my previous blogs and came across this one I was supposed to post back in January!!! would you believe. But somehow it got lost in the list and wasn't put up, but i like it, so decided to post it today. Hope you like it, I've left it as it would have gone up except for this paragraph.

Our family has become a little bigger today, my cousin's wife has just delivered a beautiful baby boy into the family and everyone is so happy for them.

As we knew she was having a boy I was able to get the card done a couple of weeks ago and after looking through my stamp sets for new babies I decided on using this one as the others seemed to be a bit dated now.  I'd seen it on Pinterest and CASd it (sorry I can't remember who's it is) but thank you.


To recreate this card follow the guide below:
cs = Card Stock, dsp = Designer Series Paper, ® = Retired

Start with a base card measuring 21 14.5cm scored at 10.5.
first layer is DSP measuring 9.7 x 13.7 and adhered straight down.
With some off cuts of whisper white and balmy blue stamp the Welcome, Kangaroo and Little one from the Animal Outings stamp set leaving room around each of them to do the die cutting.

Colour the kangaroo, I used my stampin' blends for this crumb cake and call me clover from my new blends as well as Ivory and nude from my old stash.
Using the Layering Circles for the soft foam scallop circle, Stitched Shapes for the two larger white circles, Stitched Labels for the little one circle and small heart. Wood Crate for the heart. All of these can be die cut at the same time.
Now die cut the Kangaroo using the Animal Friends dies.
Emboss the welcome circle and the larger circle using the Subtle folder.
Adhere the kangaroo to the larger circle using dimensional pads and ground him with a bit of colour.
Arrange the rest of the elements using a combination of wet glue and dimensional pads.
Add a ribbon.

Will be back again soon with more cards


Love Annette x


Tuesday 28 May 2019

Fox Builder Punch meets Happy Birthday Gorgeous

Hello Folks,

This is a very easy card to make, and fun to do. I believe it was on Julie's Japes the Paper Haven blog.


To recreate this card follow the guide below:
® = retired, (sab) = Sale-A-Bration, (H) = Hostess, (nsu) = not stampin’ up, (ss) = Stamp set, DSP = designer series paper, (cs) = Card Stock

Base card measures 14.8 x 21cm scored at 10.5cm and dry emboss using the Subtle folder.

Highland Heather matt measures 9.5 x 11cm
Gingham Gala (dsp) measures 9 x 11cm
Highland Heather circle measures 7 x 7cm
Whisper White circle measures 6.5 x 6.5cm
Highland Heather & Whisper White banners measure 6.5 x 5cm
Smoky Slate measures 6.5 x 6.5cm

Dry emboss the front of the base card using the Subtle folder

Adhere the Gingham Gala (dsp) to the Highland Heather matt using liquid glue.

Use dimensional pads to attach this matt to the base card.

Die cut the 2 circles at the same time, using the Layering Circles dies for the larger one and the Stitched Shapes  dies for the smaller one. Adhere these together using liquid glue, then attach to the card using dimensional pads.

Now put the mouse together. 

Using the Fox Builder punch and Smoky Gray (cs) punch out 1 fox, then using Basic Black punch the smaller nose.
Punch 2 circles using a ¾" Circle punch in Smoky Slate
Using Owl Builder punch, punch the 2 larger circles in Blushing Bride (cs), the 2 feet in Smoky Slate and the 2 smallest circles in Basic Back (cs).

For definition sponge the edge of the all the pieces in corresponding ink.

Adhere all the pieces to the card base using liquid glue except for the head and feet.

Stamp the happy birthday from the Happy Birthday Gorgeous (ss) and punch out using the Duet Banner Punch. Punch a second banner in Highland Heather and layer these together using small dimensional pads. Add the owls feet as hands using liquid glue. Add this to the base card again using small dimensional pads.

Color 3 Basic Rhinestones using the Highland Heather Blends and add them across the bottom of the card.

Will be back again soon with more cards.
Annette x

Thursday 23 May 2019

Celebrate You meets Happy Birthday Gorgeous

Hi Friends, and welcome to my world.

For this card I'm using up some of my really old card stock and DSP, but it can be made easily with some of the current DSP, Card Stock and embellishments. 

Do you like my new Mothers Day present (I just love it) it's from my young grandson, who always gets granny a nice card and present,  as well as mummy.

I got lovely cards and presents, from all my beautiful children and Grandchildren. 

You may notice from previous posts Owls are one of my things and this pair are especially nice.


To recreate this card follow the guide below:
® = retired, (sab) = Sale-A-Bration, (H) = Hostess, (nsu) = not stampin’ up, (ss) = Stamp set, DSP = designer series paper, CS = Card Stock

Start with a card base of Early Espresso (cs) measuring 11 x 29 cm scored at 14.5 cm
River Rock® (cs) measuring 8 x 2.5 cm
Cajun Craze (cs) measuring 3.5 x 9.5 cm
Well Worn® DSP measuring 6.7 x 21 cm

Fold the DSP in half at 10.5cm, and with the open side on the right mark at 4cm up and cut diagonally to the top on the right hand side (this makes the wedge for both sides), then cut down the centre to get the 2 pieces and adhere to the base card using liquid glue.

Stamp the It's your day! from the Happy Birthday Gorgeous (ss) in Cajun Craze onto the River Rock (cs).

Die cut the Celebrate sentiment form the Celebrate You thinlits along with the stamped It's your day! using the larger label die from the Lakeside framelits at the same time.

Adhere the Celebrate using multipurpose adhesive sheet applied to the (cs) before die cutting.

Adhere the It's your day! using dimensional pads.

Add some Candy Dots for added interest!!

Will be back again soon, thanks for dropping by.

Annette X


Tuesday 7 May 2019

Beautiful Bouquet meets Beauty Abounds

Hi All, 

Well it looks like spring is on the way, it's a little warmer here in the West Midlands.


To recreate this card follow the  guide below:
® = retired, (cs) = card stock, (ss) = Stamp Set,(dsp) = Designer Series Paper

Start with a base card of Daffodil Delight measuring 14.8 x 21 cm scored at 10.5. 

Then a layer of  Old Olive (cs) measuring 10 x 14.3 cm, this is embossed using the Petal Burst folder.

On a piece of Whisper White (cs) measuring 12 x 4.5 cm and using the Beauty Abounds (ss) stamp the flowers in Old Olive.

Colour the flowers and leaves using Daffodil Delight and Call Me Clover Stamping'  Blends.

Now cut the flowers into 3 equal sections (each 4cm) adhere to the Old Olive layer using dimensional pads.

Adhere a strip of Daffodil Delight Organdy ribbon down the right hand side of the card using glue dots.

On Whisper White (cs) stamp the Happy Birthday from the Beautiful Bouquet (ss) in Daffodil Delight, then using the smaller of the group of circles in the Beauty Abounds (ss) stamp over the Happy Birthday (stamping off once first) in Daffodil Delight and Old Olive.

Die cut  the Happy Birthday using the smallest of the ovals from the Stitched Shapes Framelits and at the same time die cut the Smallest Scalloped Oval in Daffodil Delight from the Layering Ovals framelits.

Adhere the Happy Birthday sentiment to the scalloped oval using liquid glue. Then adhere this to the Old Olive card using dimensional pads.

Make a long tailed bow and adhere below the sentiment using glue dots.

Add some Rhinestones randomly down the flowers!!!

Will be back again soon with some more cards


Annette X

Sunday 5 May 2019

Botanical Butterfly meets Bitty Birthdays

Hi all, hope you're feeling good today!!

Todays card is a very simple one and so easy to make!

I've not made this person a card before, so hope she likes it, I sure did.


To recreate this card follow the guide below:
® = retired, (sab) = Sale-A-Bration, (H) = Hostess, (nsu) = not stampin’ up, (ss) = Stamp set, DSP = designer series paper, CS = Card Stock


Start with a base card of Whisper White (cs) measuring 14.8 x 21 cm scored at 10.5 (my base card is (nsu)).
This is followed by a mat of Whisper White (cs) measuring 10 x 14 cm and embossed using the Subtle folder, then adhered to the base card using liquid glue.

The next layer is a piece of our white Flax ribbon measuring 9.5 and each end folded and cut diagonally to form the V shape. This is attached to the card using glue dots about 8 cm from the bottom of the mat.

You now need two squares die cut using the Stitched Shapes framelits, the largest one with the Botanical Butterfly DSP and the next sized down one, using Whisper White (cs). Once this one is die cut emboss using the Subtle folder. Attach the whisper white one to larger dsp using dimensional pads then adhere the dsp square to the base card the same way (making sure the Subtle grain is vertical).

Cut a piece of Whisper White (cs) measuring 8.5 x 2 cm and stamp using the Birthday Wishes sentiment from the Itty Bitty Birthdays (ss) in Grapefruit Grove , use the Tailored tag punch to create the tails, emboss using the Subtle folder (with the grain going in a horizontal direction)  then adhere to the base card using dimensional pads.

Now fussy cut one of the butterflies form the Botanical Butterfly dsp and adhere it to the white square using liquid glue. (I used my Wink of Stella along the body and edges of the butterfly wings to add some sparkle.

To finish the card off just add 3 Gingham Gala adhesive backed Sequins!!!

hope you liked this card.

Will be back again soon with more cards.
Annette X


Friday 3 May 2019

Best Birds meets Dragonfly Dreams

I Was really pleased with the way this card turned out. 

It was created for my friend Peg using a lovely colour combo and it was also easy to make once I worked out the best way of doing the bokeh dots.


To recreate this card follow the guide below:
(r) = retired, (sab) = Sale-A-Bration, (h) = Hostess, (nsu) = not stampin’ up, (ss) = Stamp set, (dsp) = designer series paper, (cs) = Card Stock

Start with a base card of Highland Heather measuring 14.8 cm x 21 cm, scored at 10.5 cm.
The next layer is Whisper White measuring 14.8 cm x 10.5 cm, this is then embossed using the Tufted dynamic folder. Next wrap some of the Sale-A-Bration's Organdy ribbon around it and tie with a knot. Adhere this to the base card using liquid glue.
On a scrap piece of Whisper White and using the Stamparatus to be able to double stamp, stamp the Bokeh Dots in Balmy Blue, then wipe the stamp and stamp again in Highland Heather.
Stamp the dragonfly from the Dragonfly Dreams (ss) onto Vellum using Highland Heather twice.
Stamp 3 of the small flower head from the Best Birds (ss) again using Highland Heather, also stamp the sprig of leaves from the same set on Whisper White in Soft Sea Foam.
Now using the Rectangle Stitched framelits, die cut the bokeh dots with the 3rd smallest rectangle from the the group of eight while at the same time die cut one of the dragonflies using the Detailed Dragonfly thinlits, one of the flower heads and the sprig of leaves using the Birds & Blooms thinlits. Now die cut the second dragonfly and second flower head, followed by the third flower head.
For the sentiment stamp the happy birthday from the Happy Birthday Gorgeous (ss) using Highland Heather, this is then attached to the card using dimensional pads.
Now using liquid glue adhere the two dragonflies together down the centre spine only, then using a bone folder slightly curl the top wings and place a small dimensional pad between the top and bottom wings where you can see the Rhinestones on the wings.
In the top left corner and using liquid glue adhere the top two leaves from the sprig just under the rectangle, now add the 3 flower heads using glue dots.
Finish off with more Rhinestones one in each of the flower heads and one in the centre of the dragonfly. Now scatter a few more Rhinestones around the card.

Will be back again soon with more cards!

Annette x


Thursday 2 May 2019

Animal Friends meets Well Said & Tufted

Hi everyone,

I just love this card and was inspired by one I had seen on Pinterest some time ago.

As you can see it's for my Grandson who was born 3 months early this time last year. He is now a gorgeous health little one year old. Happy Birthday darling xx


To recreate this card follow the guide below:
® = retired, (sab) = Sale-A-Bration, (H) = Hostess, (nsu) = not stampin’ up, (ss) = Stamp set, DSP = designer series paper, CS = Card Stock

Start with a base card of Whisper White (cs) measuring 17.5 x 25 cm scored at 12.5 cm. (my base card is nsu)

This is followed by a layer of Lemon Lime Twist (cs) measuring 16.5 x 12 cm and adhered to the base card using liquid glue.

 The next layer is Animal Expedition (dsp) measuring 15.5 x 11 cm, embossed using the Tufted Dynamic folder. this is also adhered down using liquid glue.

With Whisper White (cs) stamp the Giraffe from the Animals Outing (ss) using Memento Tuxedo Black ink and colour using Mango Melody, Calypso Coral and Soft Suede Stamping' Blends.

With a thin strip of Whisper White (cs) stamp the Happy and Birthday from the Well Said (ss) then trim down to just fit.

There's some die cutting to be done now and this can all go through the big shot in one go.

Die cut the coloured in giraffe and small leaves in Lemon Lime Twist from the Animal Friends thinlits, the 2nd largest circle from the Stitched Shapes framelits along with the 1st and grandson using nsu dies, and old (sab) Bermuda Bay Glimmer Paper. (the alternative for the number is the Stamping' Up large number dies).

Adhere the number with liquid glue onto the circle then adhere the leaves and giraffe to the back of the circle again with liquid glue.

Use dimensional pads to adhere the circle to the base card, then the happy and birthday to the circle.

Back soon with more cards!!

Annette X