Hi Folks, it's a lovely day here today, hope its nice where you are!!
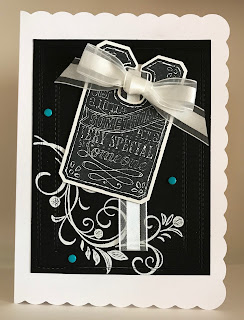
Todays card is a blast from the past, with a another retiring stamp set. I CASed it from one I'd seen on Pinterest by Stampin fun with Selene.
To recreate this card follow the guide below:
® = retired, (sab) = Sale-A-Bration, (H) = Hostess, (nsu) = not stampin’ up, (ss) = Stamp set, DSP = designer series paper, CS = Card Stock
Start with a base card of Whisper White (cs) 7" x 10" scored at 5" (my base card is (nsu).
You now need a piece of Basic Black (cs) measuring 4⅛" x 5½" and the Falling Flowers ® (ss) along with the Stitched Rectangle dies.
I found For this stage my Stamparatus gave me excellent placement for the image, which is stamped using VersaMark then heat embossed with White Embossing Powder.
Once embossed layer the largest and 3rd largest of the rectangles over it and die cut (you now have 3 pieces). Starting with the outer frame adhere to the base card using liquid glue, then do the same with the middle frame making sure there are no gaps. Wrap some of the White Organza Ribbon ® round the 3rd frame and secure it. Now adhere in the middle of the card using liquid glue and making sure again there are no gaps.
For the last stage you need Whisper White (cs) measuring at least 2½" x 3¾", Chalk Talk ® (ss) and the Chalk Talk ® dies.
Use the Stamparatus again for the topper and Memento Tuxedo Black ink, as it will probably need a couple of layers of ink (depending on how juicy your ink pad is). Once stamped die cut it and adhere to the card using dimensional pads.
Make a bow with some of the Organza Ribbon and adhere to label using a dimensional pad, then add some random Candy Dots ®.
Don't worry it's not as hard to make as it sounds.
Will be back again soon with more cards.
Annette x

No comments:
Post a Comment