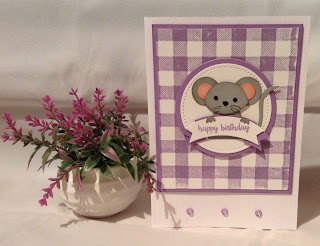
This is a very easy card to make, and fun to do. I believe it was on Julie's Japes the Paper Haven blog.
To recreate this card follow the guide below:
® = retired, (sab) = Sale-A-Bration, (H) = Hostess, (nsu) = not stampin’ up, (ss) = Stamp set, DSP = designer series paper, (cs) = Card StockBase card measures 14.8 x 21cm scored at 10.5cm and dry emboss using the Subtle folder.
Highland Heather matt measures 9.5 x 11cm
Gingham Gala (dsp) measures 9 x 11cm
Highland Heather circle measures 7 x 7cm
Whisper White circle measures 6.5 x 6.5cm
Highland Heather & Whisper White banners measure 6.5 x 5cm
Smoky Slate measures 6.5 x 6.5cm
Dry emboss the front of the base card using the Subtle folder
Adhere the Gingham Gala (dsp) to the Highland Heather matt using liquid glue.
Use dimensional pads to attach this matt to the base card.
Die cut the 2 circles at the same time, using the Layering Circles dies for the larger one and the Stitched Shapes dies for the smaller one. Adhere these together using liquid glue, then attach to the card using dimensional pads.
Now put the mouse together.
Using the Fox Builder punch and Smoky Gray (cs) punch out 1 fox, then using Basic Black punch the smaller nose.
Punch 2 circles using a ¾" Circle punch in Smoky Slate
Using Owl Builder punch, punch the 2 larger circles in Blushing Bride (cs), the 2 feet in Smoky Slate and the 2 smallest circles in Basic Back (cs).
For definition sponge the edge of the all the pieces in corresponding ink.
Adhere all the pieces to the card base using liquid glue except for the head and feet.
Stamp the happy birthday from the Happy Birthday Gorgeous (ss) and punch out using the Duet Banner Punch. Punch a second banner in Highland Heather and layer these together using small dimensional pads. Add the owls feet as hands using liquid glue. Add this to the base card again using small dimensional pads.
Color 3 Basic Rhinestones using the Highland Heather Blends and add them across the bottom of the card.
Will be back again soon with more cards.
Annette x

No comments:
Post a Comment