Monday 5 August 2019

Lilypad Lake meets Perennial Birthday

Lilypad Lake meets Perennial Birthday

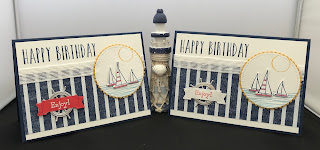
Well Perennial Birthday seems to be my go to stamp set for birthdays at the moment. Especially for male cards.

These two cards are the same except for the Enjoy sentiment, I couldn't decide which one to use so did one of each. I'm veering towards the red on white, which do you prefer?


It's quite an easy card to make (I don't do hard cards) ha ha!!

To recreate this card follow the guide below:
® = retired, (sab) = Sale-A-Bration, (H) = Hostess, (nsu) = not stampin’ up, (ss) = Stamp set, (DSP) = designer series paper, (CS) = Card Stock,
when working with layering dies I start with the largest and work down (ie: the largest is number 1 and the smallest 4).

Card Stock and measurements: (Centimetres)
Night of Navy: 21 x 14.5scored at 10.5
Whisper White: 4 pieces, 14.3 x 10, 4.5 x 3.5, 5.5 x 2, 6.5 x 6.5
Crushed Curry: 7 x7
Silver Foil: 4 x 4
Come Sail Away DSP: 14.3 x 6
Flax Ribbon: 14.3
Embossing Folders: Subtle
Dies: Layering Circles, Lakeside, Smooth Sailing,  Stitched Shapes
Stamp Sets: Bella & Friends ®, Lilypad Lake, Perennial Birthday, Sailing Home
Stampin' Blends: Poppy Parade
Stampin' Pads: Balmy Blue, Crushed Curry, Night of Navy, Poppy Parade

Stamp the happy birthday in the top left corner of the Whisper White layer in Night of Navy.
Adhere the DSP about 0.5 from the bottom of the same layer using liquid glue.
Add the ribbon at the top of the DSP half on half off, and adhere using tear n tape.
On the square of Whisper White,  stamp the waves at the bottom, then the yachts (don't worry about the overlay) and lastly the sun towards the top (make sure it's not too high up.
On the smallest piece of Whisper White stamp the Enjoy sentiment in Poppy Parade.
On the last piece of Whisper White stamp the yachts again in Night of Navy.
Now colour in the sails using the blends.
Place all items to be die cut on your plate together. Silver Ships Wheel, Crushed Curry scalloped circle No:4, yacht scene Stitched Shapes circle No: 2, banner, separate group of yachts.
Adhere the yacht scene to the scalloped circle using liquid glue then attach to the base card using dimensional pads.
Overlay the yachts using dimensional pads.
Adhere the banner to the Helm using liquid glue and attach to the base card using dimensional pads.
Will be back again soon with more cards!!
Annette X
Tuesday 30 July 2019

Painted Seasons meets Beautiful Bouquet

Hi folks, well I've been busy lately getting some cards done for the next few weeks.

This one I  think is quite pretty and not too hard to make.


We have two anniversaries, for this month so I made them the same card as they don't see each other and once I'd made the first one, I liked it so much I made it again for the second, swapping the colours for the flowers.


Once done, I think I prefer the one on the left, what about you?


To recreate this card follow the guide below:
® = retired, (sab) = Sale-A-Bration, (H) = Hostess, (nsu) = not stampin’ up, (ss) = Stamp set, DSP = designer series paper, (cs) = Card Stock

Base card is Whisper White (cs) measuring 21 x 14.5cm scored at 10.5cm, then dry embossed using the Subtle folder.


Whisper White panel measures 14.5 x 6.5cm and is dry embossed using the Lace Dynamic folder. This is edged with some ® Rushed ribbon, adhered using double sided tape and then added to the base card using dimensional pads.


Using Whisper White (cs) stamp the 2 flowers from the ® Painted Seasons (ss) in Terracotta Tile and Rococo Rose (just love these new colours) and 3 of the leaves in Mint Macaron then die cut using the ® Four Seasons dies.


Stamp the sentiment from the Beautiful Bouquet (ss) and die cut using the peek a boo label die from the Stitched Labels dies.


Arrange the flowers and leaves on the card front and attach using dimensional pads along with the sentiment towards the bottom.


Finish off with a bow at the bottom using the Polka Dots Tulle ribbon.


Will be back again soon with more cards

Annette x

Wednesday 24 July 2019

Frist Frost meets Stitched All Around

I love both these sets and yeah they've carried forward into the new catalogue along with their dies.

And it's all so easy to do, the new Distinctive stamps are great!!!!


To recreate this card follow the guide below:
cs = Card Stock, dsp = Designer Series Paper, ® = Retired

There is a base card of Rococo Rose (cs) measuring 21 x 14.5cm scored at 10.5cm.

Next a layer of Whisper White (cs) measuring 10 x 14cm and this is dry embossed using the Subtle folder.

With Whiper White (cs) stamp the sentiment from the Stitched All Around (ss) in Rococo Rose ink and die cut using the Stitched Labels dies.

Again with Whisper White stamp the flowers from the First Frost (ss) in Rococo Rose and Terracotta Tile ink and die cut using the Frosted Bouquet dies.

Now die cut 2 sprigs in Old Olive (cs) and 3 of the leaves in Vellum using the Frosted Bouquet dies.

Adhere the Whisper White  background layer to the base card.

Arrange the sprigs and leaves at the back of the sentiment and adhere down. I split them into smaller pieces to do this (I adhered them down using liquid glue and secured with sellotape).

Use dimensional pads to attach to the card, then again use dimensional pads to attach the flowers and add the Sequins ®.

Hope you liked todays card.
Back again soon with more cards
Annette x

Sunday 30 June 2019

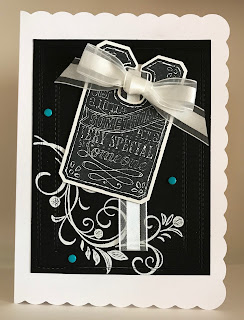
Chalk Talk meets Falling Flowers

Hi Folks, it's a lovely day here today, hope its nice where you are!!

Todays card is a blast from the past, with a another retiring stamp set. I CASed it from one I'd seen on  Pinterest by Stampin fun with Selene.


To recreate this card follow the guide below:
® = retired, (sab) = Sale-A-Bration, (H) = Hostess, (nsu) = not stampin’ up, (ss) = Stamp set, DSP = designer series paper, CS = Card Stock

Start with a base card of Whisper White (cs) 7" x 10" scored at 5" (my base card is (nsu).

You now need a piece of Basic Black (cs) measuring 4" x 5½" and the Falling Flowers ®  (ss) along with the Stitched Rectangle dies.

I found For this stage my Stamparatus gave me excellent placement for the image, which is  stamped using VersaMark then heat embossed with White Embossing Powder.

Once embossed layer the largest and 3rd largest of the rectangles over it and die cut (you now have 3 pieces). Starting with the outer frame adhere to the base card using liquid glue, then do the same with the middle frame making sure there are no gaps. Wrap some of the White Organza Ribbon ® round the 3rd frame and secure it. Now adhere in the middle of the card using liquid glue and making sure again there are no gaps.

For the last stage you need Whisper White (cs) measuring at least 2½" x 3¾", Chalk Talk ®  (ss) and the Chalk Talk ®  dies.

Use the Stamparatus again for the topper and Memento Tuxedo Black ink, as it will probably need a couple of layers of ink (depending on how juicy your ink pad is). Once stamped die cut it and adhere to the card using dimensional pads.

Make a bow with some of the Organza Ribbon and adhere to label using a dimensional pad, then add some random Candy Dots ®.

Don't worry it's not as hard to make as it sounds.

Will be back again soon with more cards.
Annette x

Saturday 29 June 2019

Beautiful Bouquet meets Bouquet Bunch

Well Jenny's big day has arrived.

From 5:00pm tonight all our children will be married, she's so excited and so are her daughters, who are going to be bridesmaids.

It's 8.30 now and I'm enjoying my last few minutes of tranquility before they all arrive to get ready!

As for the card I went for simple and stylish. There's a lot of my old stash in this one.


I was inspired by a card made by Lou Katzelman

To recreate this card follow the guide below:
® = retired, (sab) = Sale-A-Bration, (H) = Hostess, (nsu) = not stampin’ up, (ss) = Stamp set, (DSP) = designer series paper, (CS) = Card Stock

Start with  a card base of Whisper White (cs) 17.5 x 25 cm scored at 12.5 cm
(my base card is (nsu)
Bride ® (dsp) measuring 12.3 x 17 cm
Silver Foil measuring 7 x 7 cm
Window sheet measuring 7 x 7 cm
Gorgeous Grape (cs) measuring 3.5 cm x 16.5 cm
Whisper White (cs) measuring 3.5 x 11.5 cm
Sahara Sand (cs) measuring 7 x 9.5 cm
  • Make a window in the Bride ®  (DSP) using the 2 largest square shapes from the Stitched Shaped framelits 
  • Place the (DSP) on top of the base card and using a light pencil, mark out the square on the base card
  • Stamp the sentiment from the Beautiful Bouquet (ss) in Basic Grey inside the marked square then remove the pencil mark
  • Stick the piece of Window Sheet at the back of the Bride (DSP) using Tear and Tape
  • Adhere Foam Adhesive Strips around the window and along the edges of the (DSP) 
  • Remove the backing from the strips at the bottom of the card and the bottom 3 sides of the square  but not the top of the square or card to the base card
  • Insert the sequins into the square then remove the rest of the backing  paper and adhere the rest of the card down
  • On the strip of Whisper White  Mr & Mrs from the Beautiful Bouquet (ss) in Basic Grey 
  • Die cut the Mr & Mrs Using the Bouquet Bunch framelits die then die cut 3 fern leaves in Silver Foil, 3 small flowers in Whisper White, 4 small flowers in Gorgeous Grape, 1 larger flower in Gorgeous Grape and the stems in Sahara Sand
  • Wind the metallic thread round the stems attaching the Mr & Mrs label and adhere to the card using liquid glue
  • Add the 3 ferns, then the 3 white flowers, then the 4 small purple flowers also with liquid glue then larger flower in the middle using small dimensional pads and adding the Rhinestones as the flower centres. (Instead of rhinestones I used some small beads  I have in my stash.
Will be back with more cards soon
Annette X

Thursday 27 June 2019

Layering love meets Beautiful Bouquet

Welcome to my world of crafting.

This is the second anniversary card for this month and it's for my oldest son and his lovely wife.

Not the same as the one earlier in the month, but I did use the open hearts from that card in the making of this one.


To recreate this card follow the guide below:
® = retired, (sab) = Sale-A-Bration, (H) = Hostess, (nsu) = not stampin’ up, (ss) = Stamp set, DSP = designer series paper, CS = Card Stock

The base card is a top fold, Thick Whisper White (cs) measuring 10.5 x 29.7 cm, scored at 14.85 cm.

The strip of ® Bride dsp at the bottom measures 10.5 x 2.5 cm and is adhered using liquid glue.

Using the Stitched Be Mine dies, cut the large scalloped heart in Grapefruit Grove with the next heart down, layered inside it. (you now have 2 hearts)

Using the ® Stitched Be Mine(ss) stamp the sentiment,  Live Laugh Love onto Whisper White (cs) in  Grapefruit Grove and repeat the die cutting process carried out for the Grapefruit Grove hearts (you now have 4 hearts, 2 white and 2 Grapefruit Grove).

Dry emboss the Whisper White heart using the Subtle embossing folder.

Again using the Stitched Be Mine dies, and (sab) Grapefruit Grove Foil, die cut the open hearts.

Adhere the scalloped heart near the top of the base card using liquid glue, next adhere the open hearts using a sponge and liquid glue.

Attach the embossed heart using dimensional pads.

Now using the Beautiful Bouquet (ss) and Whisper White (cs)  stamp the Happy Anniversary in Grapefruit Grove, then using the Layering Ovals dies, die cut this sentiment and the corresponding scalloped oval in Grapefruit Grove.

Finally attach the scalloped oval to the sentiment oval using small dimensional pads and then adhere this to the card using liquid glue, attach 3 of the Foil hearts where you want them again using dimensional pads.

Job done!!

Upon refection I should have dry embossed the anniversary sentiment to match the heart.

Will be back again soon with more cards
Annette x

Monday 17 June 2019

Beautiful You meets Swirly Frames

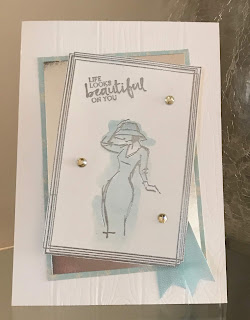
Quick 'n' simple, Well I took a card created by Amanda Charlesworth and used different colours to use up some of my retired stash then jazzed it up with some ribbon and sparkle.


To recreate this card follow the guide below:
(r) = retired, (sab) = Sale-A-Bration, (h) = Hostess, (nsu) = not stampin’ up, (ss) = Stamp set, (dsp) = designer series paper, (cs) = Card Stock

You will need:

Whisper White card base 10.5 x 29.7 cm scored at 14.85 cm.
Falling in Love (r) (dsp) measuring 11.5 x 8 cm.
Silver Foil measuring 11 x 7.5 cm.
Whisper White measuring 11 x 7.5 cm.
Beautiful You (ss) and Swirly Frames (ss).
Soft Sky ink (r), VersaMark.
Seam Binding (r) ribbon.
Aqua Painter, Stamparatus, Pinewood Planks embossing folder, Silver embossing powder, basic Rhinestones.

Emboss the front of the base card using the Pinewood Planks folder.
Adhere the silver foil to the dsp using liquid glue.
Cut a 4' strip of the ribbon, fold in half and cut a banner shape at each end and adhere towards the bottom of the silver foil.
Adhere this to the base card at a slight angle.
Prep the piece of whisper white (cs) using an embossing buddy and stamp the lady, rectangle frame and sentiment using versamark and heat emboss with silver powder.
Add a wash of colour using Soft Sky across the dress and hat.
Trim round the edge of the frame, add dimensionals to the back and adhere to the card.
Finish off with a few Rhinestones.

Will be back again soon with more cards

Annette X